Once you’ve familiarized yourself with the basics of Maestro, the next step is to start planning out what a full test suite looks like for your app. We’ll walk through this process and address some of the key questions you’ll likely run into:
- How do I decide what belongs in a single Flow vs multiple Flows?
- How should I organize my Flows?
- How can I run a different set of Flows in different circumstances?
We’ll start with a general rule of thumb for breaking down your Flows:
A Flow should test a single user scenario
It might be tempting to test your entire app as a long sequence of commands under single Flow. Don’t do this! There are a number of ways this will make things harder for you:
- If any command fails, this will halt the entire test — you won’t get information about the rest of your app
- You won’t be able to run your test cases in parallel, increasing execution time in CI
- Your test results will show up as a single Flow result (even if you are testing many different parts of your app)
Instead, break down your Flows into smaller scenarios that each represent a single scenario you’d like to verify. As is usually the case in these types of situations, this is more of an art than a science. You’ll need to decide on the granularity of your Flows based on the complexity of your app.
A good starting point is thinking about user intent. What is a user trying to accomplish in each scenario (eg. “Search for a item”, “Log in”, “Purchase a product”, “Add a comment”)? If your Flow is covering more than one user intent, it probably make sense to break it up into multiple Flows.
Use subdirectories to organize your Flows
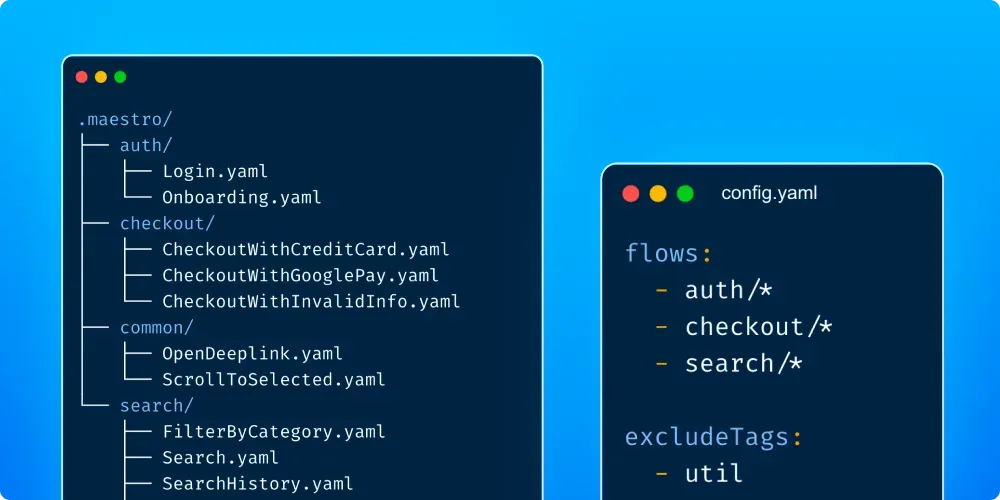
To organize your Flow files, you can place related Flow files into subdirectories. You can choose the directory structure you like, but our recommendation is to group Flows by feature:
.maestro
├── auth
│   ├── Login.yaml
│   └── Onboarding.yaml
├── checkout
│   ├── CheckoutWithCreditCard.yaml
│   ├── CheckoutWithGooglePay.yaml
│   └── CheckoutWithInvalidInfo.yaml
├── common
│   ├── OpenDeeplink.yaml
│   └── ScrollToSelected.yaml
└── search
    ├── FilterByCategory.yaml
    ├── Search.yaml
    ├── SearchHistory.yaml
    ├── SortByDate.yaml
    └── SortByPrice.yaml
You’ll need to configure your config.yaml to specify the Flows you want to run. By default, Maestro will only run Flows at the root level of your Flow directory.
# config.yaml
flows:
  - auth/*
  - checkout/*
  - search/*
Notice that we omitted the common/ directory above since it only holds utility Flows which shouldn’t be run as standalone Flows.
Alternatively, you can avoid updating your config.yaml every time you add a feature directory by using a more generic file glob. This does however require adding the util tag to every Flow in the common directory so we can exclude that tag from executing:
# config.yaml
flows:
  - */*

excludeTags:
  - util
Those were just a couple common patterns, but you are free to organize your Flow subdirectories as you please using a combination of flows, excludeTags, and includeTags.
Use Flow tags to run different sets of Flows in different scenarios
It’s often useful to maintain separate sets of Flows for different situations. For instance, you may want to run your entire test suite nightly, but only a subset of those Flows on every pull request or commit to your main branch. The easiest way to manage this behavior is using Flow Tags.
Let’s say you want to run your smoke tests on every pull request. First, tag each smoke test Flow with smokeTest (You can name the tag whatever you want):
appId: com.example
tags:
  - smokeTest
---
- launchApp
...
Then, you’ll be able to run just these flows by including the smokeTest tag when uploading to Maestro Cloud. The example below shows how you can configure this in a GitHub workflow. The last line is the relevant configuration:
name:  Run Smoke Tests

on:
  pull_request:
    branches: [ main ]

jobs:
  build:
    runs-on: macOS-latest
    steps:
      - uses: actions/checkout@v2
      - name: Install Xcode
        uses: maxim-lobanov/setup-xcode@v1
        with:
          xcode-version: latest
      - run: xcodebuild -project MyApp.xcodeproj -scheme MyApp -destination 'platform=iOS Simulator,name=iPhone 11'
      - uses: mobile-dev-inc/action-maestro-cloud@v1.2.3
        with:
          api-key: ${{ secrets.MAESTRO_CLOUD_API_KEY }}
          app-file: <app_name>.app
          include-tags: smokeTest
Or when running on the command line, use the --includeTags option:
$ maestro test --includeTags smokeTest .maestro/
$ maestro cloud --includeTags smokeTest example.app/ .maestro/
To run the full test suite, simply omit the include-tags/--includeTags configuration. Your nightly GitHub workflow might look something like the config below. Note that the include-tags key is not specified this time:
name:  Run Nightly Test Suite
on:
  schedule:
    - cron: '0 2 * * *' # run at 2 AM UTC

jobs:
  build:
    runs-on: macOS-latest
    steps:
      - uses: actions/checkout@v2
      - name: Install Xcode
        uses: maxim-lobanov/setup-xcode@v1
        with:
          xcode-version: latest
      - run: xcodebuild -project MyApp.xcodeproj -scheme MyApp -destination 'platform=iOS Simulator,name=iPhone 11'
      - uses: mobile-dev-inc/action-maestro-cloud@v1.2.3
        with:
          api-key: ${{ secrets.MAESTRO_CLOUD_API_KEY }}
          app-file: <app_name>.app
Any other questions?
This guide covered some of the most common questions we hear from team ramping up on Maestro, but we’d love to chat if you have any follow up questions! The quickest way to connect with the Mobile.dev team, is to join our Slack community and post your question in the #maestro channel. You can also reach us via email at support@mobile.dev.