
If you were using Maestro for iOS in the past, chances are — you have seen the issues with elements not being easily discoverable or outright missing. No more!
Today we are excited to announce a completely new version of the iOS driver for Maestro, rebuilt from the ground up. Starting from Maestro 1.18 the new driver now provides a complete understanding of the UI layout.
TL;DR
All you have to do is upgrade to the latest version of Maestro. Didn’t use Maestro before? Just install it with this one-liner:
curl -Ls "https://get.maestro.mobile.dev" | bashCurious to learn about our journey and how we actually arrived at the new implementation? Then keep reading as we shed light on how Maestro works internally.
What makes Maestro different
Before we dive into the implementation details, let’s clarify one thing — what are we actually accomplishing with Maestro that is not solved by existing solutions like Appium?
While there are several advantages that we hope you already had a chance to experience yourself (take ease of setup for one), at the core, the superpower of Maestro lies in the fact that, unlike Appium, Maestro fully controls view matching and assertion logic.
Where Appium delegates call to underlying XCUITest and Android’s Espresso frameworks, Maestro believes that it can do a better job than both by proactively pulling view hierarchy from the device and executing its own view-matching logic. Among other things, this allows for more sophisticated view selection conditions such as relative matching.
Take this snippet, for example, that selects a view underneath a Title text field:
- tapOn:
    below: “Title”
So, how do we build it?
Unifying the interface
The first problem to solve — how do we define an OS-agnostic API that would allow us to keep Maestro unaware of differences between iOS and Android?
Meet Driver— a rather simple interface that defines what you can do with a device. It boils down to two things: getting a view hierarchy and tapping on something.
// Maestro framework itself is written in Kotlin
interface Driver {
    // Returns a root of the view hierarchy.
    // We can use this information to understand what is currently
    // shown on the screen.
    fun contentDescriptor(): TreeNode
    // Taps on a given point on the screen
    fun tap(point: Point)
}
Where TreeNode is an OS-agnostic representation of a view (such as UIView/SwiftUI View on iOS or View on Android).
data class TreeNode(

    // Contains view attributes that are brought to a common format
    //
    // For example attributes[“text”] contains the text shown on
    // the screen and attributes[“bounds”] contains visual position
    // of the element.
    val attributes: Map<String, String>,

    // Children of this view node, if any
    val children: List<TreeNode>
)
Our initial implementation with IDB
Now that the interface is defined, how do we implement it?
For our initial implementation, we decided to leverage Facebook’s IDB tool — a great multipurpose CLI tool for working iOS Simulators. For example, one can obtain the view hierarchy from the device using a single command:
$ idb ui describe-allAs a result, we get a neat list of all* accessibility nodes visible on the screen. Here is the output when running the command on a Settings app:
[
  {
    "AXFrame": "{{16, 338}, {358, 44}}",
    "AXUniqueId": null,
    "frame": {
      "y": 338,
      "x": 16,
      "width": 358,
      "height": 44
    },
    "role_description": "button",
    "AXLabel": "General",
    "content_required": false,
    "type": "Button",
    "title": null,
    "help": null,
    "custom_actions": [],
    "AXValue": null,
    "enabled": true,
    "role": "AXButton",
    "subrole": null
  },
  // etc.
]
From that, we can get any element the user might be looking for, get its bounds, and finally tap on it using:
$ idb ui tap X YGreat! Seems like all the components are there. We can then relatively easily write mapping code in Kotlin that would take the data from IDB, find the element, and then call IDB back to tap on an element.
Or so we thought.
Problems with IDB
Though the approach worked for many common cases, it introduced a few significant problems that became blockers for any serious attempt to implement a test in Maestro on iOS.
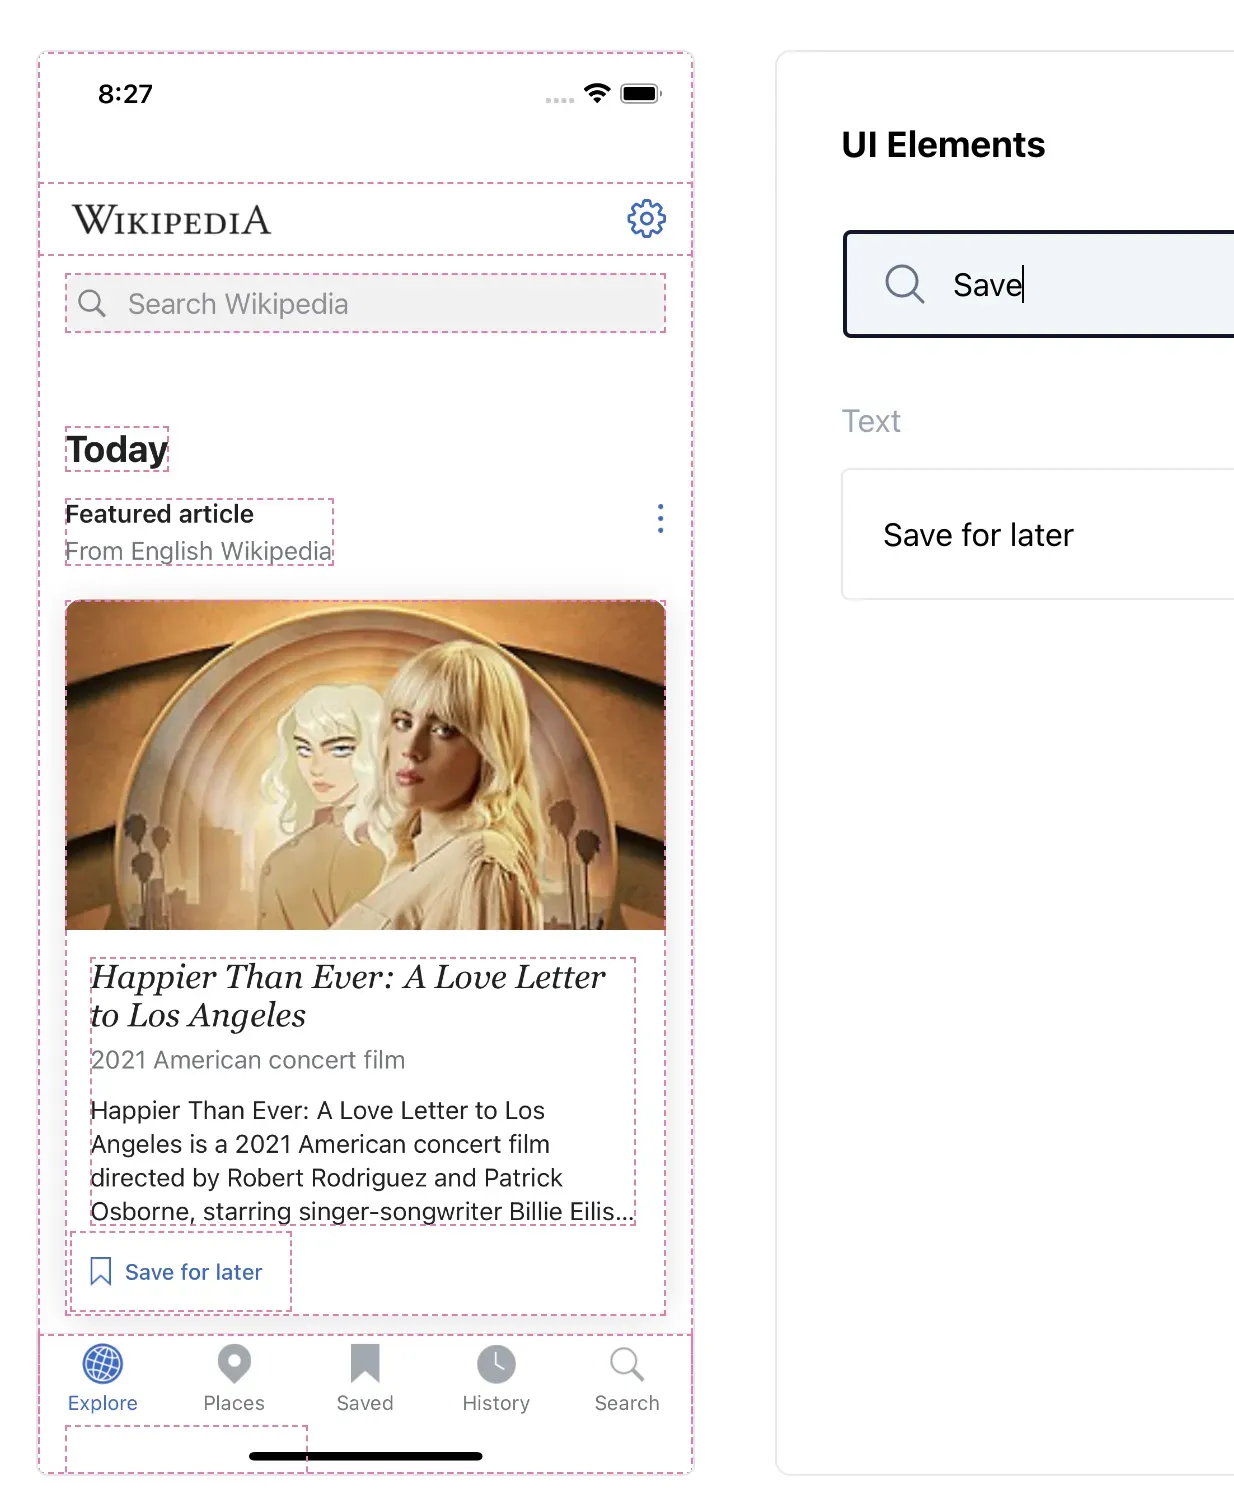
Problem 1 — Incomplete list of UI elements
Earlier we said that idb ui describe-allreturns all visible elements. That was not quite true. Most notably, elements of UITabBarare somehow completely ignored by IDB.
Take this example:
Saved tab is clearly visible on the screen. Yet, it is missing from the idb ui describe-alloutput and, as a result, is not showing up in Maestro Studio (that we can easily verify by running maestro studio):
Problem 2 — Mystical UNKNOWN gRPC errors
From time to time, IDB crashes with cryptic gRPC-related errors.
io.grpc.StatusRuntimeException: UNAVAILABLE: Network closed for unknown reason at
    maestro.drivers.IOSDriver.contentDescriptor(IOSDriver.kt:154) at
    maestro.Maestro$findElementWithTimeout$1.invoke(Maestro.kt:287) at
    maestro.Maestro$findElementWithTimeout$1.invoke(Maestro.kt:286)
The frequency depends on the exact app (some apps crash every time). Apparently, the cause is somewhere within IDB internals (GitHub issue) and is seemingly related to the fact that IDB is using private Apple APIs to obtain the accessibility information from the Simulator.
Problem 3 — iOS 16 Support
At the time iOS 16 was published, existing installations of IDB were not able to interact with it properly, resulting in a wide range of problems starting from gRPC errors mentioned earlier and ending with accessibility information being completely empty.
Later on, we figured out that updating the IDB version alongside re-installing Xcode solved the problem, but that still set a precedent — IDB can be fragile to iOS version updates.
Searching for a solution
Because of the issues mentioned above, the experience of writing tests for iOS at times, was quite frustrating, unlike our Android counterpart. We had to do something about it.
If we can’t use IDB for fetching view hierarchy, how else can we do it? What tools allow us to get that information? The first thing that came to mind was— the XCUITest framework.
As we considered this option, we immediately asked ourselves — aren’t we trying to move away from the platform-specific frameworks? Isn’t Maestro supposed to do the view-matching logic?
The answer — use an XCUITest as our API layer to get access to the hierarchy. If we can somehow establish communication between Maestro and iOS device, we can transmit this information and still let Maestro handle all the important decisions:
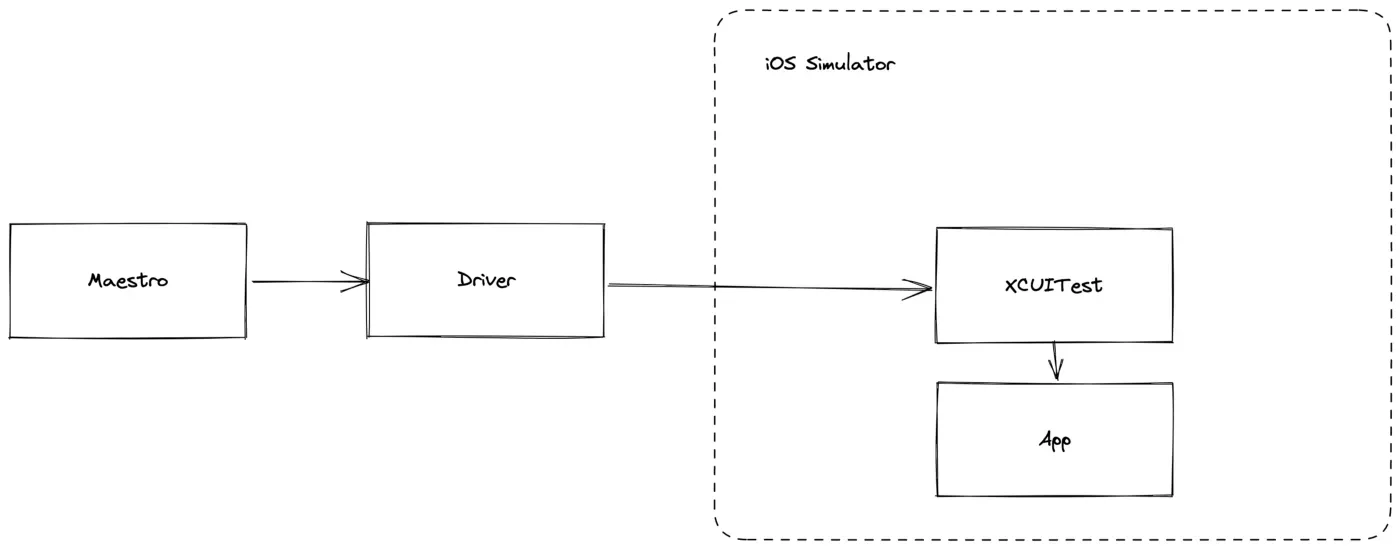
Writing XCUITest driver
To start off, we had to figure out how we could talk to XCUITest from Maestro, which is not only written in Kotlin but also runs outside of the iOS Simulator itself. The solution — start an HTTP server.
We created an XCUITest that appears to be a normal test at first. The difference is that it never completes and instead launches an HTTP server (we are using FlyingFox) that can reply back with the information we need from the application, such as view hierarchy.
func testHttpServer() async throws {
    let server = HTTPServer(port: 9080)
    let subTreeRoute = HTTPRoute(Route.subTree.rawValue)
    await server.appendRoute(subTreeRoute) { request in
        let handler = SubTreeRouteHandler()
        return try await handler.handle(request: request)
    }

    try await server.start()
}
SubTreeRouteHandler can then obtain an instance of XCUIApplication using bundle id to get XCUIElementSnapshot which is a snapshot of attributes of XCUIElement and its descendants.
// appId of the running app
let xcuiApplication = XCUIApplication(bundleIdentifier: appId)

let viewHierarchyDictionary = try xcuiApplication
  .snapshot()
  .dictionaryRepresentation

let hierarchyJsonData = try JSONSerialization.data(
    withJSONObject: viewHierarchyDictionary,
    options: .prettyPrinted
)
return HTTPResponse(statusCode: .ok, body: hierarchyJsonData)
This new driver also determines the current running app in order to get the bundle id of the running app. The [RunningAppRouteHandler](https://github.com/mobile-dev-inc/maestro/blob/main/maestro-driver-ios/maestro-driver-iosUITests/Routes/Handlers/RunningAppRouteHandler.swift) in the HTTP server is responsible to return the first foreground app out of the installed apps.
Maestro iOSDriver runs this XCUITest to create the HTTP server before Maestro requests any view hierarchy.
With the help of the following endpoints, Maestro is now able to extract the view hierarchy of the running app:
/runningApp: A POST request with request body as installed apps. Returning the foreground running app./subTree?appId=com.example.runningApp: A GET request to get the view hierarchy of the running app passed as a query parameter.
Let’s verify whether this worked by running maestro studio:
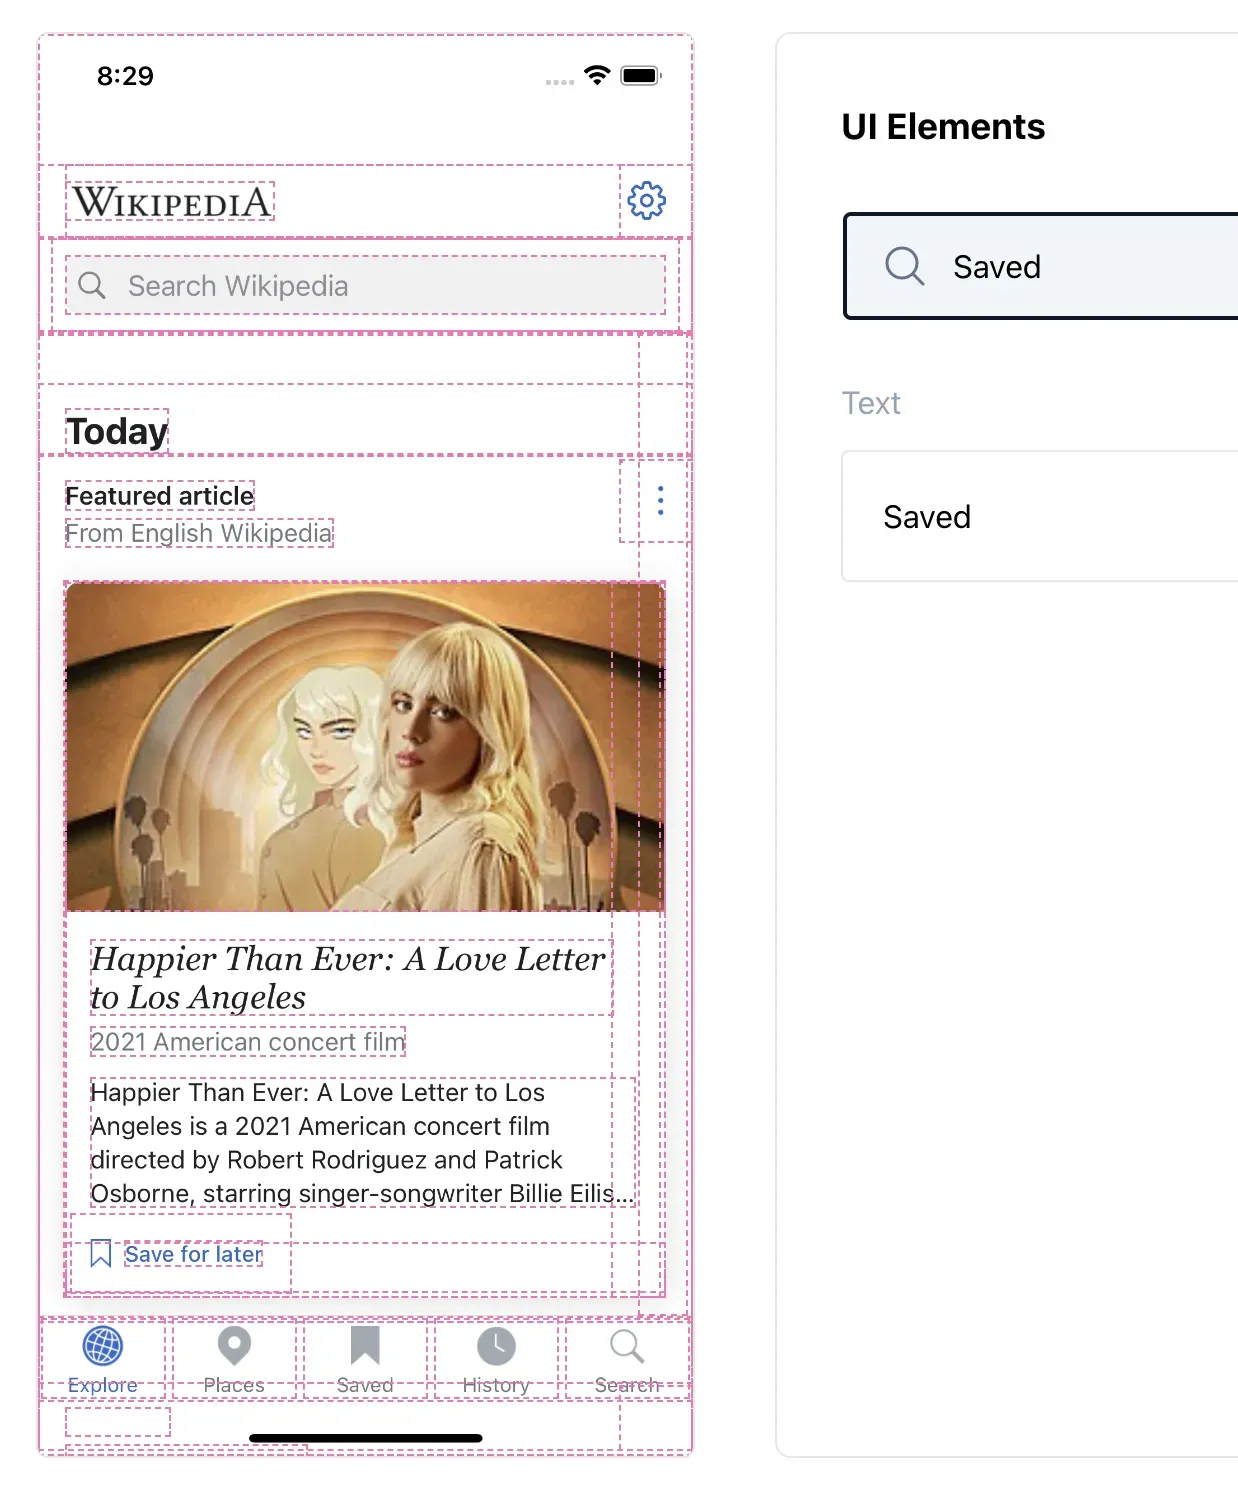
Eureka! The driver can clearly see the Saved tab now.
And if we run our earlier test again, we see that it now passes too!
Conclusion
XCUITest output showed to be superior to IDB in terms of the richness of the view hierarchy, making this our official driver for iOS starting from Maestro 1.18.0.
We invite you to give it a go by installing Maestro via this one-liner command:
curl -Ls "https://get.maestro.mobile.dev" | bashDid it work for you? Did it not? In either case, we would love to hear back. You can always reach us by joining our Slack community or tagging @maestro__dev on Twitter.
Credit
I wanted to take the opportunity to call out the amazing work done by Artem Sidorenko and Berik Visschers who contributed to Rebuilding the iOS Driver throughout.