Testing forms in React Native apps can be tricky, but Maestro Studio simplifies the process. This free desktop tool helps you create end-to-end tests visually - no coding required. As you interact with your app, Maestro Studio generates YAML commands that you can export and refine. It handles common testing challenges like element loading, retries, and cross-platform compatibility for iOS and Android.
Key Highlights:
- Visual test authoring: Create tests using Maestro Studio's element inspector and command generation.
- Cross-platform testing: One test flow works for both iOS and Android.
- Stability: Automatically waits for elements and retries failed interactions.
- Streamlined setup: Works with minimal system requirements; no app code changes needed.
With Maestro, you can test input validations, error handling, and form submissions reliably. The tool’s YAML-based syntax keeps tests simple to maintain, even as your app evolves. Below, we’ll cover setup, test creation, and best practices to ensure smooth form testing.
Complete Maestro Studio Setup and Testing Workflow for React Native Forms
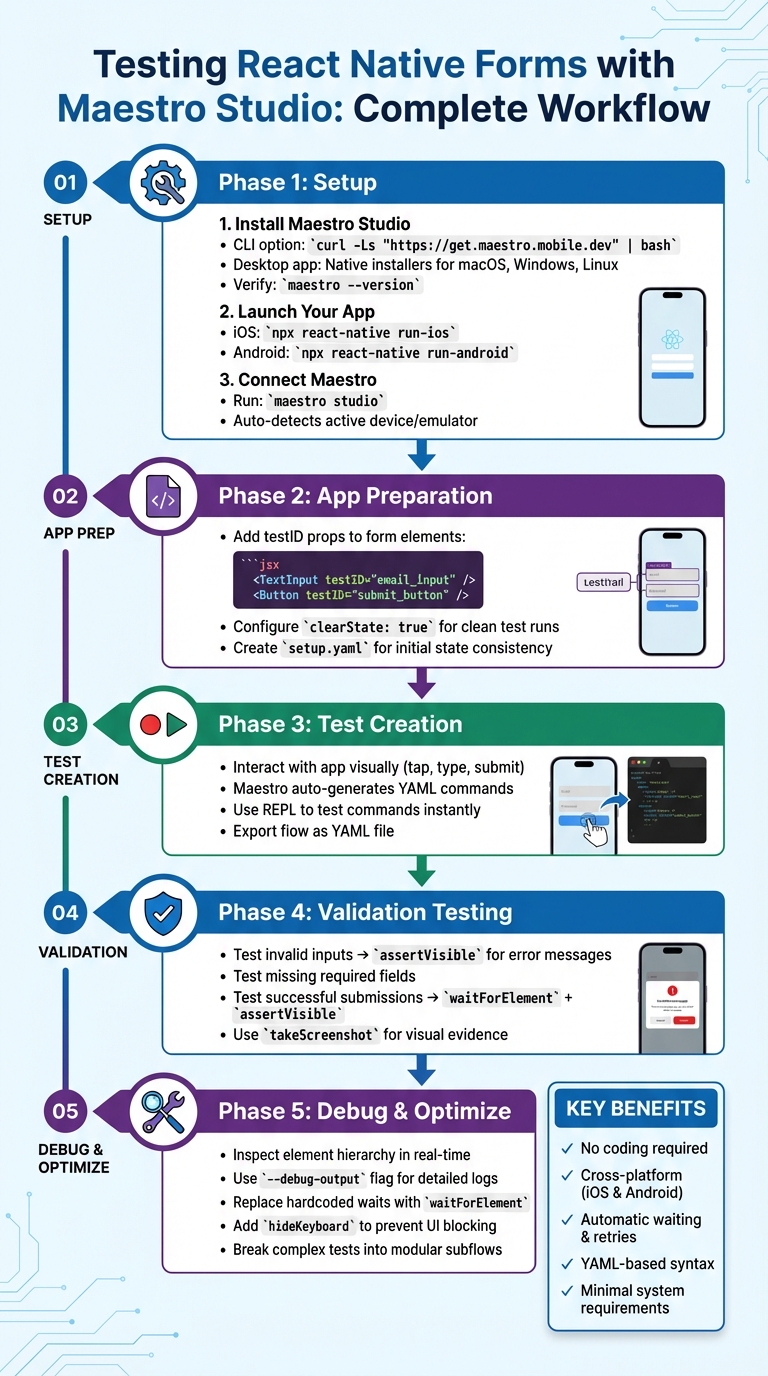
Setting Up Maestro Studio for React Native Testing
Installing Maestro Studio
To kick off your testing journey with Maestro, start by installing Maestro Studio. You can choose between two installation options: the CLI version or the standalone desktop app. Both provide access to Maestro's visual testing interface, but the desktop app offers a more straightforward setup with native installers available for macOS (both Apple Silicon and Intel), Windows, and Linux.
For CLI installation on macOS or Linux, simply run this command in your terminal:
curl -Ls "https://get.maestro.mobile.dev" | bash
After completing the installation, update your system's PATH by adding this line to your shell configuration file (e.g., .zshrc or .bashrc):
export PATH="$PATH":"$HOME/.maestro/bin"
To confirm the installation, run:
maestro --version
This should display the current version of Maestro.
System requirements are minimal. Ensure you have a working React Native development environment, including Node.js and either npm or yarn. For iOS testing, you'll need macOS with Xcode and an iOS Simulator. For Android testing, you can use macOS, Linux, or Windows (via WSL2), along with Android Studio and an emulator. As Maestro’s documentation highlights:
Maestro is a single binary that works anywhere.
With Maestro Studio installed, you’re ready to connect it to your React Native app.
Connecting Maestro Studio to Your React Native App
Before launching Maestro Studio, ensure your React Native app is running on a simulator or emulator. Start your app using the appropriate command for your platform:
-
For iOS:
npx react-native run-ios -
For Android:
npx react-native run-android
If you’re using Expo, first start the app through the Expo development server, then open it in the Expo Go app.
Once your app is running, launch Maestro Studio. CLI users can do this with the command:
maestro studio
This opens an interactive, web-based UI in your browser. Desktop app users can simply click to launch the application. Maestro Studio will automatically detect and connect to the active device or emulator, displaying your app's interface in the testing environment.
To make your app more test-friendly, consider adding testID props to your React Native components. For instance:
<TextInput testID="email_input" />
While Maestro can interact with elements based on visible text, using testID props ensures your tests remain stable even if the UI changes or localization is applied. For iOS, if you run into issues with nested components (e.g., a Text inside a TouchableOpacity), set accessible={false} on the outer container and accessible={true} on the inner element.
Unlike many other frameworks, Maestro doesn’t require you to modify your app’s code or add test dependencies. This makes it easy to get started and begin visually building robust tests for your forms and other app components.
sbb-itb-e343f3a
Preparing Your React Native App for Form Testing
Configuring Your App for Testability
Before diving into test flows with Maestro Studio, you’ll want to ensure your app is set up for smooth and reliable testing. The key? Assign unique testID props to every form element. While Maestro can identify elements by visible text, relying on text selectors can lead to brittle tests when updates - like copy changes or translations - are made. As software engineer Ashish Kharche pointed out during his work on a Pokedex app in September 2023:
IDs are preferable to text selectors as they help to remove flakiness in your tests if the text changes.
To make your forms test-ready, assign testIDs to all interactive elements, such as text inputs, buttons, switches, and dropdown menus. Here’s a quick example:
<TextInput
  testID="email_input"
  placeholder="Enter your email"
/>
<TextInput
  testID="password_input"
  secureTextEntry
/>
<Button
  testID="submit_button"
  title="Sign Up"
/>
Another important step is configuring your app to launch with clearState: true. This ensures the app resets for every test run, which is essential for verifying first-time user experiences, onboarding flows, and empty form states. Once your testIDs and app state settings are in place, you’re ready to move on to organizing your test data and scenarios.
Setting Up Test Data and Scenarios
Centralizing your test data is a practical way to simplify updates and maintenance. Start by creating a JavaScript file (e.g., init.js) to define reusable data objects. These can be injected into form fields using the ${output.variable} syntax. For instance, Ashish Kharche demonstrated this approach in his Pokedex testing suite by using an output object to store values like this:
output.pokemon = { name: 'mewtwo', input: 'mewtw' }
For forms that require unique values - like email addresses with timestamps or randomly generated usernames - Maestro's evalScript command can generate dynamic test data during execution. For environment-specific details, such as API URLs or test credentials, consider defining them in the env section of your YAML files or using external .env files. This keeps sensitive information separate from your test code.
Another best practice is creating a setup.yaml file to handle repetitive tasks at the start of every test. As Ashish Kharche explained:
The
setup.yamlfile is important... [it] ensures that every test starts from the same initial state. This is crucial for the consistency and reliability of your tests.
This file can be used to initialize scripts, bypass intro screens, or navigate directly to the form you’re testing. By structuring your tests into complete user journeys and modular subflows (like login or form entry), you can make your test suite easier to maintain as it grows.
Creating and Running Form Test Flows in Maestro Studio
Building a Form Test Flow Visually
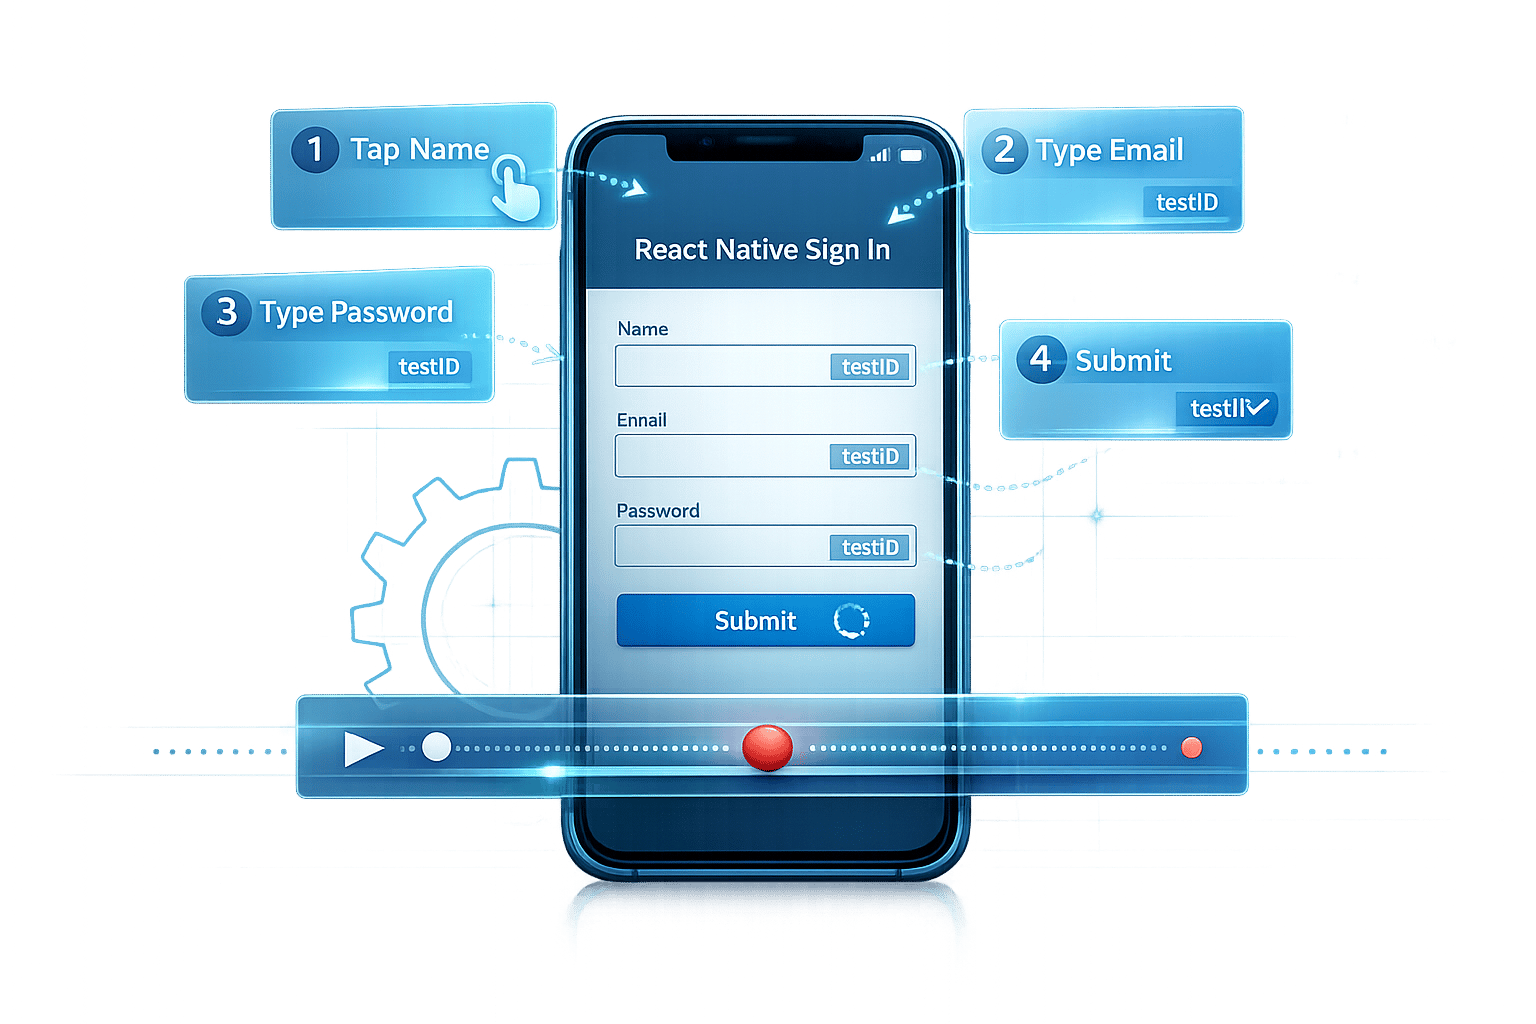
Maestro Studio simplifies the process of creating test flows by providing element inspection and YAML command generation as you interact with your app. To get started, type maestro studio in your terminal while your app is running. This launches a visual interface - accessible via your browser or desktop app - where you can see your device screen and start building your flow.
As you interact with the app - tapping on form fields, entering text, or pressing buttons - Maestro Studio captures each action and translates it into commands like tapOn, inputText, or hideKeyboard. You can also right-click on any element to inspect it and select the most reliable selector, such as testID, text, or accessibility label. Choosing testID selectors is recommended to maintain test stability if UI text changes.
The interface also features a REPL (Read-Eval-Print Loop), which allows you to manually type or tweak commands and see them execute instantly before adding them to your flow. For example, if the on-screen keyboard blocks a submit button, you can type hideKeyboard in the REPL to resolve the issue. Once you've recorded all your steps - like filling out fields, submitting the form, and verifying success messages - you can export the flow as a YAML file. This file can then be used for version control or integrated into your CI/CD pipeline. Reflecting on this feature, Leland Takamine, co-founder of mobile.dev, said in 2023:
The new ability to record Maestro Commands drastically reduces Flow authorship time, and more importantly enables anyone to write Maestro Flows!
With your flow recorded, you’re ready to move on to running the test in the cloud.
Executing Form Tests
Running your tests is as simple as clicking the "Run Locally" button in Maestro Studio. The interface provides a step-by-step view of the test in real-time, highlighting both the current command and the device screen. If a step fails, Maestro Studio pauses and offers debugging details, making it easy to pinpoint the issue.
One standout feature is Maestro's built-in delay handling. You won’t need to insert manual sleep() commands, as the framework automatically waits for elements to load - whether it’s a network request or an animation. For form submissions that involve asynchronous operations, you can use assertVisible to confirm success messages or the appearance of a new screen after processing. This declarative style ensures your tests remain clean and dependable, even with varying network conditions.
Validating Form Inputs and Handling Errors
Testing Input Validations
Once you’ve set up Maestro Studio, it’s time to verify that your React Native form enforces validation rules properly. Start by entering invalid data into a TextInput field - like an email missing the "@" symbol or a password that’s too short. After submitting the form, use the assertVisible command to confirm the correct error message appears on the screen.
For better test stability, rely on testID selectors instead of visible text. When recording validation flows in Maestro Studio, right-click on the error message, inspect it, and select the testID to avoid issues caused by text changes. If you encounter problems detecting a validation element, you can use MaestroGPT within the Studio to generate advanced commands or troubleshoot the issue.
To keep your test suite organized, consider creating separate YAML files for different validation scenarios, such as email_validation.yaml or required_fields.yaml. This modular approach simplifies debugging and makes it easier to maintain your tests over time. For example, the React Native boilerplate "Ignite" (v8.7.0) switched to Maestro as its default end-to-end testing tool in May 2023. It includes pre-configured Maestro flows in a .maestro directory, such as Login.yaml, which uses commands like clearState, launchApp, and assertVisible to validate transitions from the login screen to the dashboard.
After validating standard inputs, move on to testing how your app handles error scenarios.
Simulating Error Scenarios
To test missing required fields, tap the submit button without entering any data. Then, use the assertVisible command to verify that a "Required" error message is displayed. For invalid formats - like an incorrectly formatted phone number or an email missing its domain - use the inputText command to enter the bad data and confirm that the appropriate validation error appears.
When testing incomplete or invalid forms, submit the form and let Maestro Studio automatically generate the necessary YAML commands for you. Thanks to Maestro’s built-in delay handling, you won’t need to manually add sleep() commands to wait for validation messages to load after network requests or asynchronous processing.
Always begin error-scenario tests with the clearState command to ensure your app starts in a clean state. This prevents any leftover data from previous tests from interfering. As mobile app developer Ashish Kharche puts it:
Maestro is a simple yet powerful Open Source UI testing framework for mobile apps. The framework allows you to define and test Flows, which are parts of the user journey in your app.
Once you’ve confirmed that error handling works as expected, move on to testing successful submissions.
Validating Successful Submissions
After ensuring all validations are working, test whether your form processes valid submissions correctly. If a submission involves network requests or delays, use the waitForElement command with a timeout (e.g., 10,000ms) or waitUntilNotVisible for loading indicators. Then, use assertVisible to verify confirmation messages like "Success!" or to check if the app navigates to a new screen, such as a dashboard or profile page.
To confirm that submitted data was processed correctly, check whether the entered text appears on the confirmation screen. For dynamic content, like order numbers, use the regex: true option with assertVisible (e.g., text: "Order #[0-9]+"). To capture visual evidence of the app’s state after a successful submission, include a takeScreenshot command right after the success assertion.
For validations involving logic - like ensuring a balance is positive or a string matches a specific pattern - use the evalScript command to execute inline JavaScript. As Nawaz Dhandala from OneUptime explains:
Maestro handles the implementation details, including automatic waiting, retry logic, and element synchronization.
This built-in intelligence ensures your tests remain stable, even under varying network conditions or when animations take longer than expected. These final checks complete your Maestro Studio test flow for React Native forms.
Debugging and Optimizing Form Tests in Maestro Studio
Using Maestro Studio's Debugging Tools
Once you've set up and run your tests, debugging becomes crucial when things don't go as planned. Maestro Studio equips you with tools to quickly identify and resolve issues. Start by launching Maestro Studio with the maestro studio command to inspect your app's element hierarchy in real time. Clicking on any UI component reveals its properties and generates the corresponding YAML command. This feature ensures your selectors are targeting the right elements.
The REPL (Read-Eval-Print Loop) is a standout tool. It allows you to execute individual commands like tapOn instantly, without rerunning the entire test suite. This is incredibly useful for troubleshooting specific interactions. For more detailed insights, use the --debug-output flag when running tests through the CLI. This provides extensive logs that pinpoint exactly where a flow breaks down.
Visual tools also play a big role in debugging. Use the takeScreenshot command at critical points in your test to capture snapshots of the UI. Alternatively, add startRecording at the beginning of your flow to record the entire execution. These recordings can reveal issues like a keyboard blocking a submit button or a validation message appearing in the wrong place. These resources make identifying and resolving problems much easier.
Refining Test Flows for Stability
Stability is key to reliable testing. One way to achieve this is by using testID selectors, which remain reliable even as your UI evolves.
Avoid hardcoding wait commands. Instead, use smarter alternatives like waitForElement or waitUntilNotVisible with specific timeouts. For example, after submitting a form, replace a fixed wait: 5000 with waitForElement: "Success message" and a timeout: 10000. This approach ensures your tests adapt to varying network speeds and animations while running faster.
Keyboard interference is another common issue. Add the hideKeyboard command after entering text to prevent the keyboard from obscuring buttons or other UI elements. For nested components on iOS, such as a Text element inside a TouchableOpacity, set accessible={false} on the outer container. This ensures Maestro correctly targets the inner element.
Breaking complex tests into smaller subflows can also improve stability and maintainability. For instance, in September 2023, Ashish Kharche demonstrated this with a Pokedex React Native app. He used a main journey file (pokemon-lookup.yaml) that called multiple subflows (region-list.yaml, search-pokemon.yaml). As he explained:
Structuring tests by journey and subflow helps in breaking down the tests into smaller, more manageable pieces... This structure makes it easier to understand, write, and maintain the tests.
This modular approach not only simplifies debugging but also makes your tests easier to manage.
Finally, always start your tests with launchApp: clearState: true to ensure a clean slate. For intermittent elements like permission dialogs or cookie banners, use conditional flows with the optional: true parameter. This prevents non-critical steps from causing your entire test to fail. By refining these aspects, your form testing flows become far more resilient.
Automate E2E Testing in React Native with Maestro | Run Multiple Test Cases in One Flow
Conclusion
Testing React Native forms becomes straightforward with Maestro Studio. Thanks to its visual element selection and automatic waiting, you can create reliable tests without dealing with fragile selectors or timing problems.
The declarative YAML syntax keeps your tests easy to read and update. When your form layout changes or you tweak validation rules, adjusting your test flows takes just minutes. As Leland Takamine, Founder of mobile.dev, shared:
The new ability to record Maestro Commands drastically reduces Flow authorship time, and more importantly enables anyone to write Maestro Flows!
Maestro takes care of the common pain points in mobile testing, letting you focus on ensuring your forms work as expected. You won't need to clutter your tests with sleep() calls or troubleshoot missed taps - Maestro handles these challenges seamlessly. Whether you're testing input validations, error messages, or successful submissions, the platform aligns with your app's behavior rather than forcing you to adapt to rigid testing tools.