In the world of application development, testing is crucial to ensure the functionality and usability of the application. Maestro is a tool for UI testing, that supports testing React Native (Expo) screens and apps on both Android and iOS platforms. This guide will walk you through the process of performing end-to-end tests for a Pokedex app using Maestro.
Prerequisites
Before diving into the setup and test writing, make sure you have gone through the first part of this series.
Read blog: Pokedex UI Testing Series: Getting Started with Maestro in Expo & React Native — Part 1
It covers setting up Expo and running Pokedex locally to follow along.
Setting Up Your Workspace
Before writing a UI test using Maestro, it’s a good idea to configure your workspace. Create a config.yaml file in the .maestro directory with the following contents:
# config.yaml
flows:
  - journey/*
This configuration instructs Maestro to look for flows in the journey directory. The journey directory will contain the Flow files.
Source Code
Find the GitHub repo with source code and Maestro UI testing Flow files:
Structuring Your Tests
Maestro tests are opinionated in structure, meaning you have the flexibility to organize your tests in a way that makes sense for your app. For a deeper dive into structuring your test suite, refer to this Maestro Best Practices blog post.
In this guide, we will structure our tests by journey and subflow. Create a journey directory in the .maestro directory. This is where we will write our tests, which will refer to subflows. Subflows can be self-contained meaning they could be run as a Flow individually using maestro testor they could be simply separated into reusable parts of a bigger Flow.
Why this structure?
Structuring tests by journey and subflow helps in breaking down the tests into smaller, more manageable pieces. Each journey represents a user journey through the application, and each subflow represents a part of that journey. This structure makes it easier to understand, write, and maintain the tests.
The naming for the files is not enforced. In this blog, we have chosen to use the kebab-case.

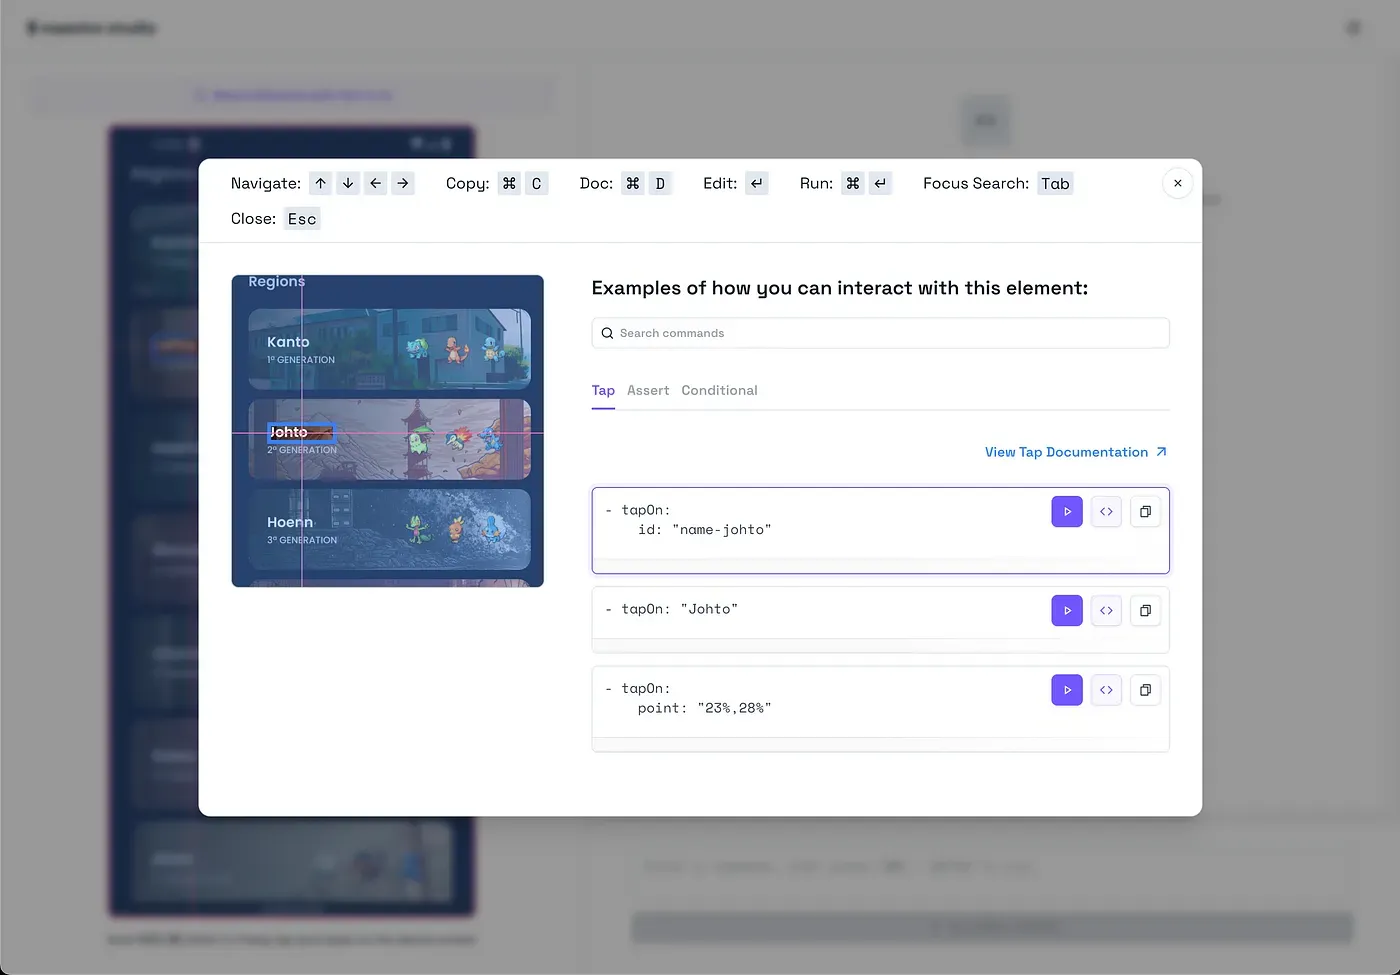
Open Maestro Studio
Maestro Studio is a feature of Maestro, that serves as a personal assistant to help write your Maestro Flows. It is built right into the Maestro CLI and can be launched in your browser by running the maestro studio command. Maestro Studio provides several functionalities:
- Visually Select a UI Element
- Automatically Generated Examples
- Executing Commands in the REPL
The tests for Pokedex were written using Maestro Studio.
To open, run on your terminal:
maestro studioCrafting Your First Test
The first step in crafting your test is to outline the entire user journey that you want to test. This journey will include several subflows, each representing a specific part of the user’s interaction with the app.
Our Pokedex app is relatively simple, so for the purpose of this blog, we will focus on just one journey. However, in a more complex app, there could be multiple journeys, each with its own set of subflows and actions.
Create a file named pokemon-lookup.yaml in the journey directory. This file will serve as the blueprint for the entire user journey you want to test.
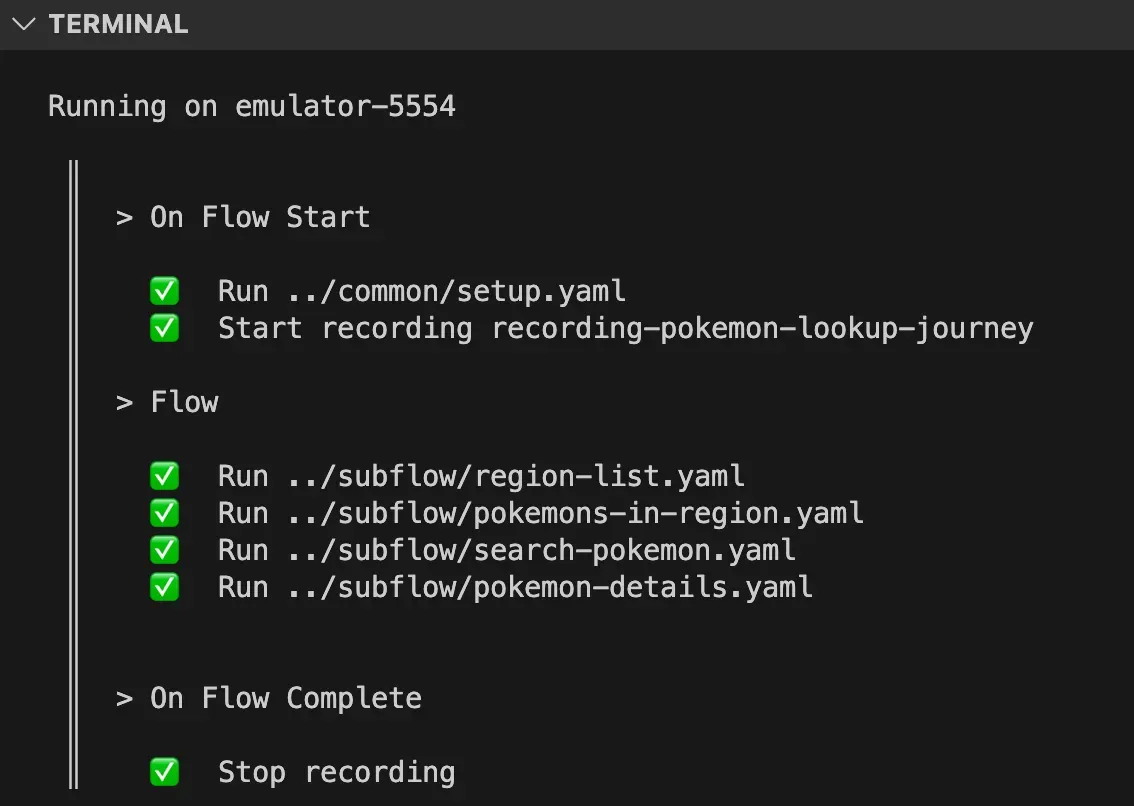
# pokemon-lookup.yaml
appId: ${APP_ID}
onFlowStart:
  - runFlow: ../common/setup.yaml
  - startRecording: recording-pokemon-lookup-journey
onFlowComplete:
  - stopRecording
---
# Check Region List
- runFlow: ../subflow/region-list.yaml

# Check Pokemons in a Region
- runFlow: ../subflow/pokemons-in-region.yaml

# Search for a Pokemon
- runFlow: ../subflow/search-pokemon.yaml

# Check Pokemon Details
- runFlow: ../subflow/pokemon-details.yaml
In this test, we have defined several actions and subflows. Let’s break down each section:
appId:This is the app id of the app you want to test, which can be found in theapp.jsonfile of your app.onFlowStart: This is a list of actions to perform before the test starts. In this case, we are running a setup flow and starting a recording.onFlowComplete: This is a list of actions to perform after the test completes. In this case, we are stopping the recording.runFlow: This is a list of subflows to run. In this case, we are running subflows to check the region list, Pokemon in a region, search for a Pokemon, and check Pokemon details.
Now that we have defined our test, it’s time to write the subflows.
Setup before Test
The setup.yaml file is handy for the initial setup of your test. It contains a series of actions and commands that need to be executed before the actual test starts. This file is typically referenced in the onFlowStart section of your journey file, ensuring it is the first thing that runs when your test starts. init.js script initializes the output object that will be used throughout the test, which we will look deeper into further in the blog.
appId: ${APP_ID}
---
- launchApp:
    clearState: true
- runScript: init.js
# Expo Development Build Specific
- runFlow:
    when:
      visible: "http://localhost:8081"
    commands:
      - tapOn: "http://localhost:8081"
- runFlow:
    when:
      visible: "Got It"
    commands:
      - tapOn: "Got It"
- runFlow:
    when:
      visible: "Toggle performance monitor"
    commands:
      - swipe:
          from:
            text: "Toggle performance monitor"
          direction: DOWN
The setup.yaml file is important for several reasons:
- Initializes the Test Environment: It ensures that the app is launched and that the test environment is correctly initialized before the actual test starts. This includes running any necessary scripts, tapping on buttons to get past introductory screens (Expo Dev), etc.
- Ensures Consistency: It ensures that every test starts from the same initial state. This is crucial for the consistency and reliability of your tests.
- Improves Test Maintainability: Separating the setup actions into a separate file, makes the test easier to understand and maintain. If the setup actions need to be changed, they can be changed in one place without affecting the rest of the test.
Why Start a Recording and Take Screenshots?
Starting a recording at the beginning of the test and stopping it at the end helps in capturing the entire test execution. This is crucial for reviewing the test run and identifying any issues that may occur during the test. It provides a visual record of the actions performed and the responses of the app, making it easier to spot any discrepancies or unexpected behaviors.
Taking screenshots at specific points in the test helps in capturing the state of the app at that moment. It provides a snapshot of the app’s UI, which is useful for verifying that the app is displaying the expected elements and layouts. Screenshots can also serve as a reference for how the app should look at different stages of the test.
Both recordings and screenshots are essential for documenting the test results and providing evidence that the test was executed correctly. They are also valuable assets for debugging and resolving any issues that may arise during the test.
Creating Your Subflows
Subflows are smaller, reusable pieces of a test. Create a subflow directory in the .maestro directory. This is where we will write our subflows.
Subflow 1: Checking the Region List
This subflow verifies that the user can view the list of regions and interact with them.
Create a file called region-list.yaml in the subflow directory with the following content:
# region-list.yaml
appId: ${APP_ID}
---
- assertVisible: ".*Regions.*"
- takeScreenshot: "regions"
- assertVisible:
    id: "name-kanto"
- assertVisible:
    id: "gen-1"
- tapOn:
id: "name-kanto"Actions:
- Assert that the text “Regions” is visible (we are using regular expressions with
.*) - Take a screenshot and save it as “regions.png”.
- Assert that the ID
name-kantois visible. - Assert that the ID
gen-1is visible. - Tap on the ID
name-kantoregion.
Let’s pause. You will notice that we are using ID selectors to find elements on the screen. IDs are preferable to text selectors as they help to remove flakiness in your tests if the text changes.
Adding IDs to Your React Native App
To interact with the elements on the screen accurately, you can add IDs to your React Native app. You can use the testID prop for this purpose. For example:
<Text testID="id-value" className="font-600 text-lg text-white capitalize">However for iOS, if your Text component is nested in a TouchableOpacity component (outer component), you will need to add the accessible={false} prop to the TouchableOpacity component. For example:
  return (
    <TouchableOpacity
      activeOpacity={0.8}
      className="w-full"
      onPress={() => navigate("list", { name, gen })}
      accessible={false} // ADD accessible={false}
    >
      <ImageBackground source={imageSource} imageStyle={{ borderRadius: 16 }}>
        <LinearGradient>
          <View>
            <Text testID={`name-${name}`} className="font-600 text-lg text-white capitalize">
              {name} // ADD testID
            </Text>
            <Text testID={`gen-${gen}`} className="font-500 text-xs text-gray-200 uppercase">
              {gen}ª Generation // ADD testID
            </Text>
          </View>
        </LinearGradient>
      </ImageBackground>
    </TouchableOpacity>
  );
For more details on interacting with nested components on iOS, refer to the Maestro Platform Support for React Native.
ID addition being detected by Maestro
This subflow is the first step in the user journey of looking up a Pokemon. It verifies that the user can see the list of regions and can tap on a specific region. By asserting the visibility of specific elements and interacting with them, we ensure that the app is functioning as expected up to this point.
Subflow 2: Checking Pokemons in a Region
This subflow verifies that the user can view the list of Pokemons in a selected region and interact with the list by swiping.
# pokemons-in-region.yaml
appId: ${APP_ID}
---
- assertVisible: ".*Kanto.*"
- takeScreenshot: "kanto-region-pokemon-list-1"
- assertVisible: ".*Bulbasaur.*"
- swipe:
    direction: UP
    duration: 4000
- takeScreenshot: "kanto-region-pokemon-list-2"Actions:
- Assert that the text “Kanto” is visible.
- Take a screenshot and save it as “kanto-region-pokemon-list-1.png”.
- Assert that the text “Bulbasaur” is visible.
- Swipe up on the screen for 4000 milliseconds.
- Take a screenshot and save it as “kanto-region-pokemon-list-2.png”.
Screenshots generated

Subflow 3: Searching for a Pokemon
This subflow verifies that the user can search for a specific Pokemon by inputting text into the search field.
# search-pokemon.yaml
appId: ${APP_ID}
---
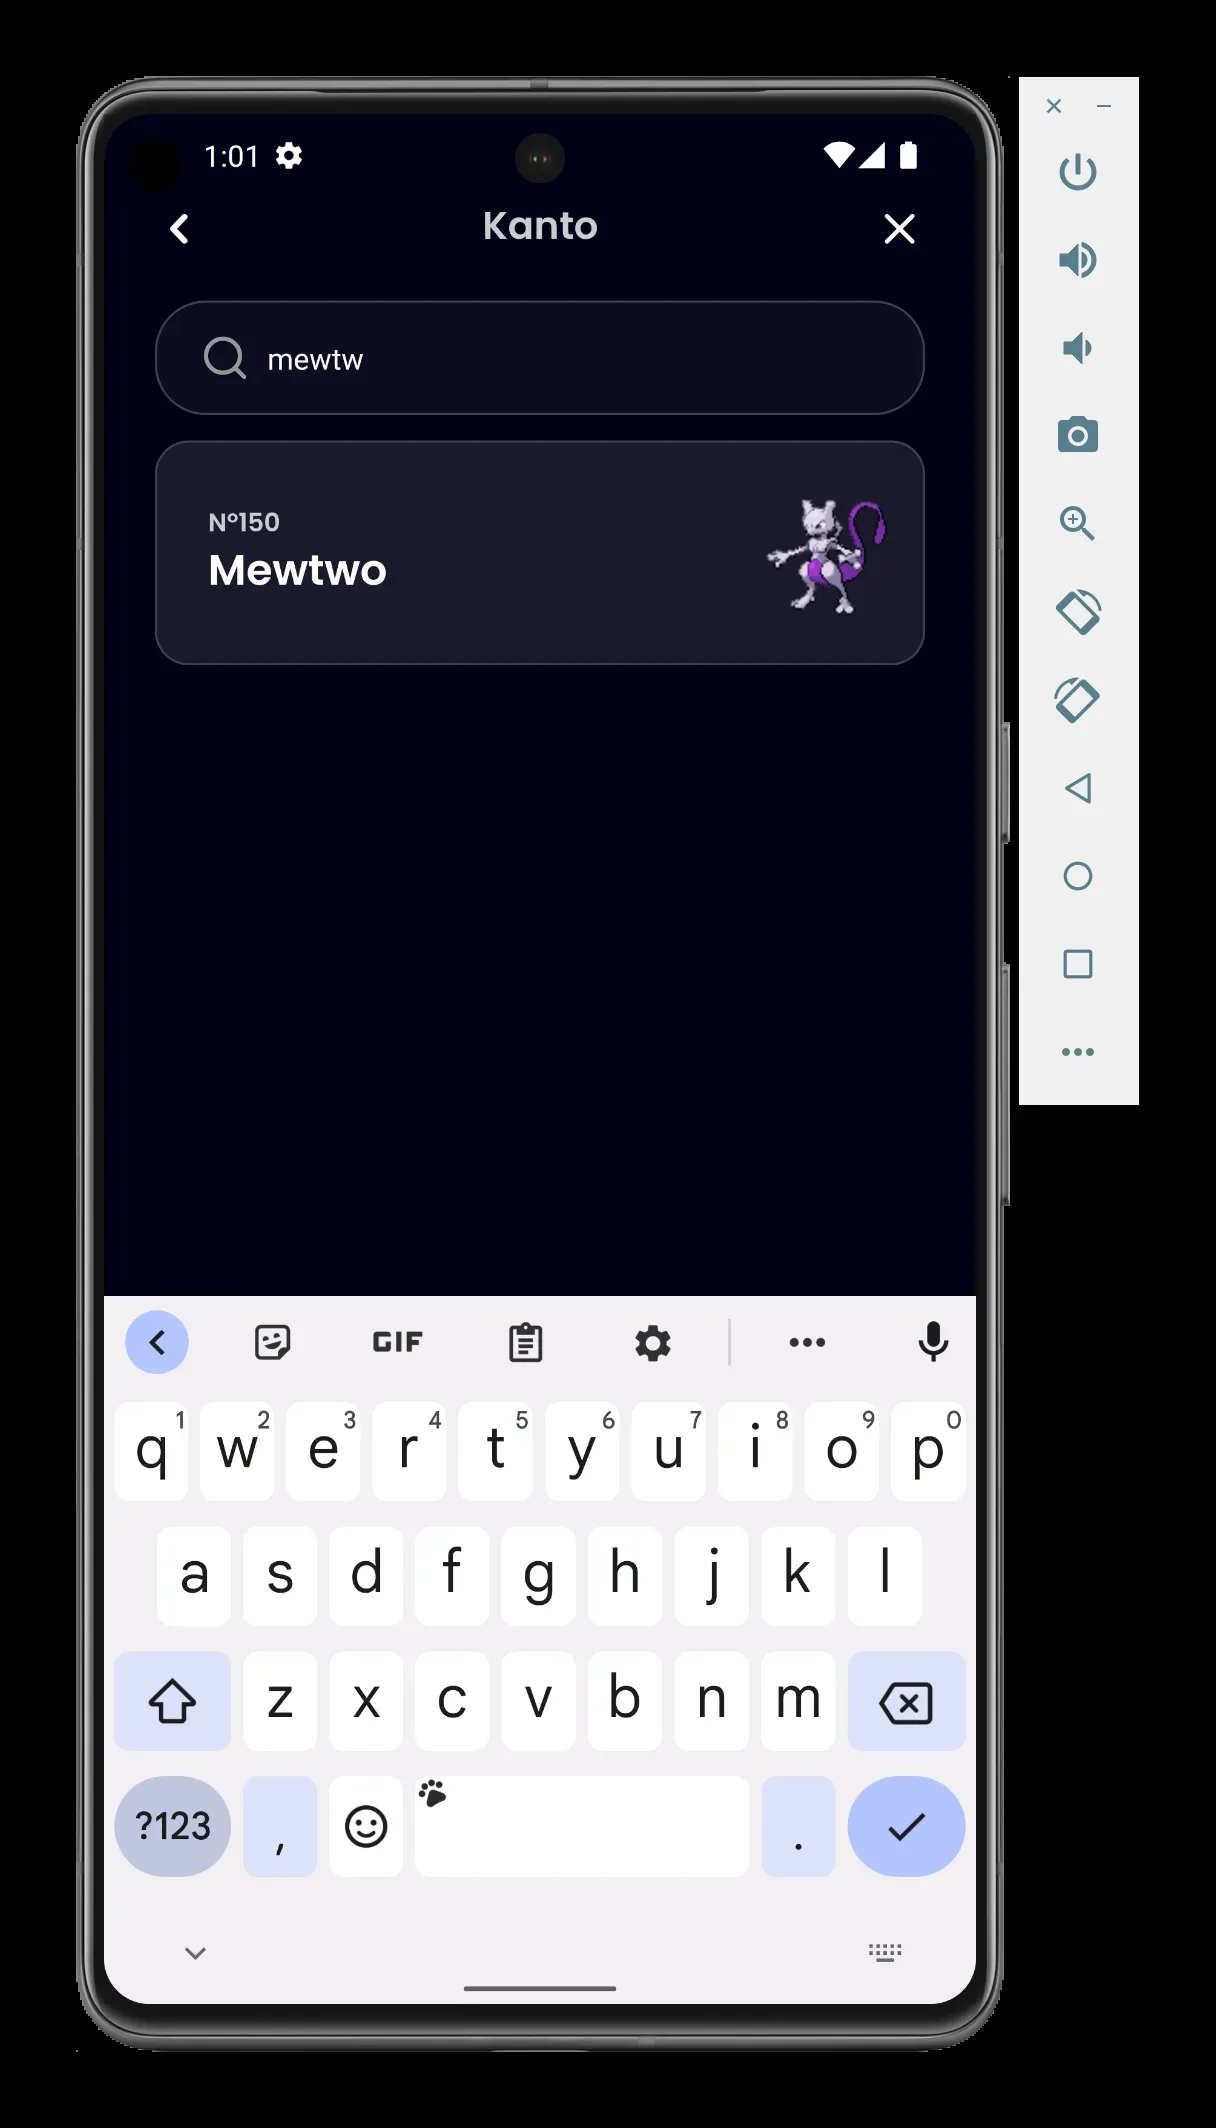
- tapOn:
id: "search-icon"
- takeScreenshot: "search-pokemon-blank"
- inputText: ${output.pokemon.input}
- takeScreenshot: "search-pokemon-${output.pokemon.input}"
- runFlow:
when:
platform: Android
commands:
- back
- runFlow:
when:
platform: iOS
commands:
- tapOn: "return"
- tapOn:
id: "name-${output.pokemon.name}"Actions:
- Tap on the search icon.
- Take a screenshot and save it as
search-pokemon-blank.png. - Input the text from the
outputof the previous subflow into the search field. - Take a screenshot and save it as
search-pokemon-${output.pokemon.input}.png. - Tap on the back button on Android or the return button on iOS.
- Tap on the Pokemon name.
Let’s pause. You will notice that we are using output.pokemon.input to get the input text.
Where does this output come from?
Creating a Script File
To store output objects that can be reused across subflows, you need to create a script file. In the common directory, create a file called init.js.
Here is the script:
// init.js
output.pokemon = {
    name: 'mewtwo',
    input: 'mewtw',
}
This script was executed at the start of Flow in _setup.yaml_ if you remember!
In this script, we are creating an output object with a pokemon object that has a name and input property.
name: 'mewtwo': This is the name of the Pokemon we want to search for.input: 'mewtw': This is the input text we want to input into the search field.
This is one of the good usages of scripts as it allows you to change Pokemon names globally from one place!
Subflow 4: Checking Pokemon Details
This subflow verifies that the user can view the details of a selected Pokemon.
# pokemon-details.yaml
appId: ${APP_ID}
---
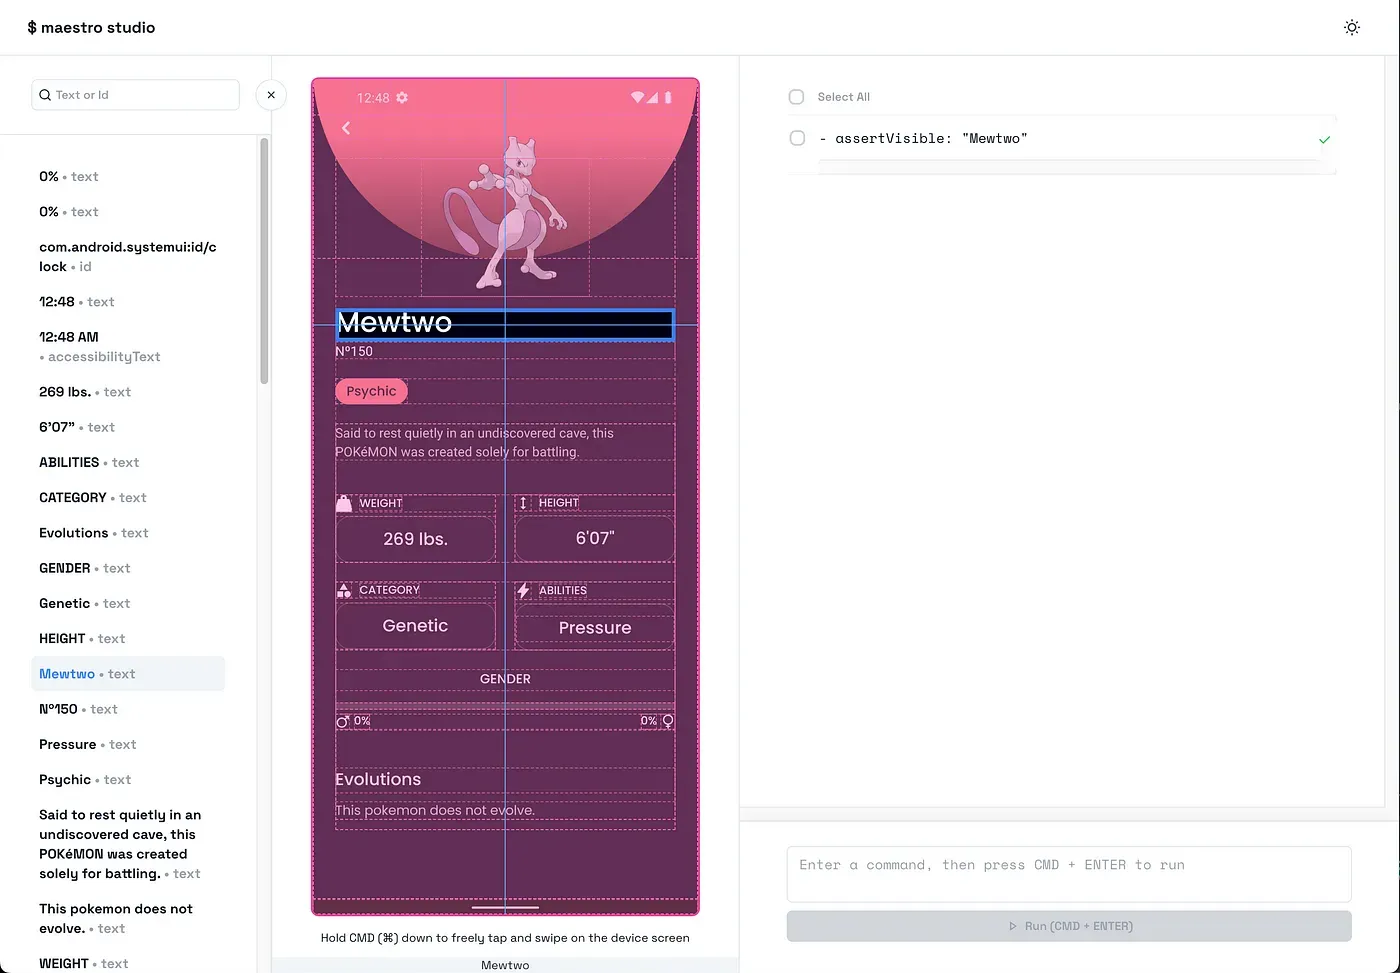
- assertVisible: ".*${output.pokemon.name}.*"
- takeScreenshot: "${output.pokemon.name}-pokemon-details"
- assertVisible: ".*Genetic.*"
- assertVisible: ".*Psychic.*"
- assertVisible: ".*This pokemon does not evolve.*"Actions:
- Assert that the text of the Pokemon name is visible.
- Take a screenshot and save it as
${output.pokemon.name}-pokemon-details.png. - Assert that the text “Genetic” is visible.
- Assert that the text “Psychic” is visible.
- Assert that the text “This pokemon does not evolve” is visible.
Running Your Test
After crafting all the subflows, you can run your test. To do so, run the following command:
maestro test -e APP_ID=com.thekharche.maestroexpopokedex .maestro/journey/pokemon-lookup.yamlRunning on CI
In the upcoming part, we will look into how to get React Native / Expo UI tests with Maestro running on CI!
Stay Tuned!
Conclusion
In this opinionated guide, we walked you through the process of setting up your workspace, structuring your tests, crafting your first test, and creating subflows for a Pokedex app. We also discussed the importance of starting a recording and taking screenshots during the test and how to add IDs to your React Native app to interact with the elements on the screen accurately.
Adapt the guide to your app testing requirements and happy testing!
References
Maestro for React Native:
Maestro Best Practices:
Maestro Best Practices for Cross-platform:
Source Code of App with Maestro Flow files:
Prerequisite:
🎹