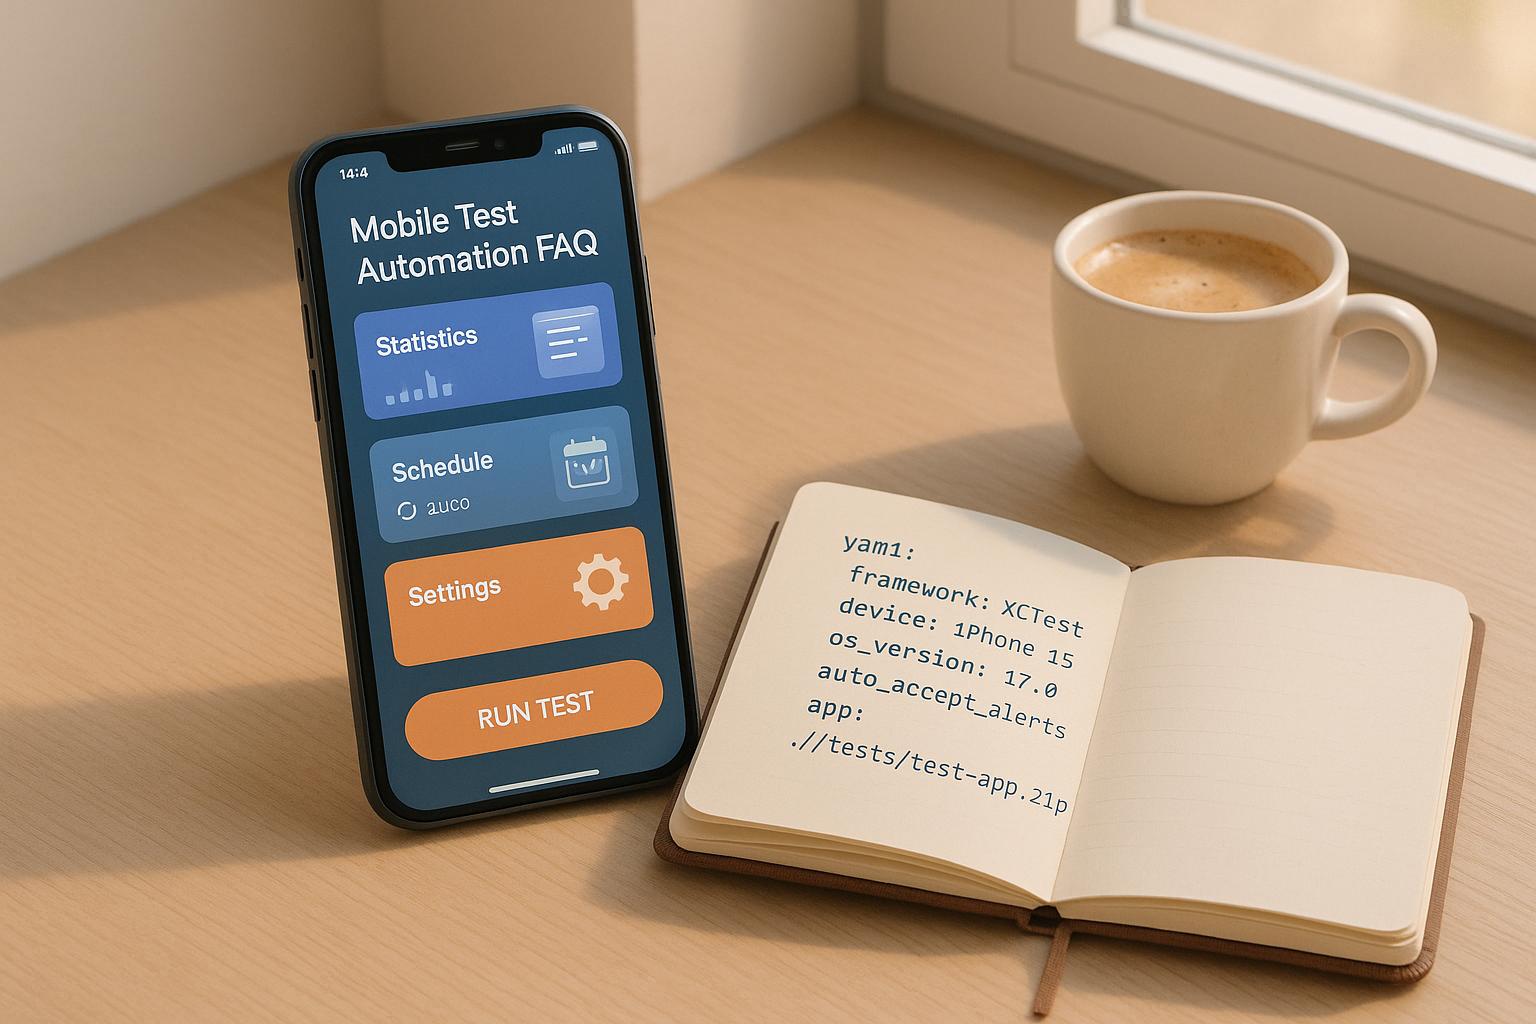
Automating app testing in CI/CD pipelines saves time and ensures reliability. Maestro simplifies this process by allowing teams to run tests in the cloud across Android, iOS, and web platforms using YAML-based flows. It integrates with popular CI/CD platforms like GitHub Actions, GitLab CI, and CircleCI, providing fast feedback and consistent results.
Key Takeaways:
- Cloud Testing Benefits: No local device management, instant OS updates, and parallel test execution.
- Maestro Features: YAML syntax for easy test creation, intelligent waits to reduce flakiness, and reusable flows.
- CI/CD Integration: Seamless setup with CLI commands and secure credential management.
- Debugging Tools: Detailed logs, screen recordings, and exit codes simplify troubleshooting.
Maestro accelerates testing workflows, reduces manual effort, and improves test reliability, making it a solid choice for teams aiming for efficient cloud testing.
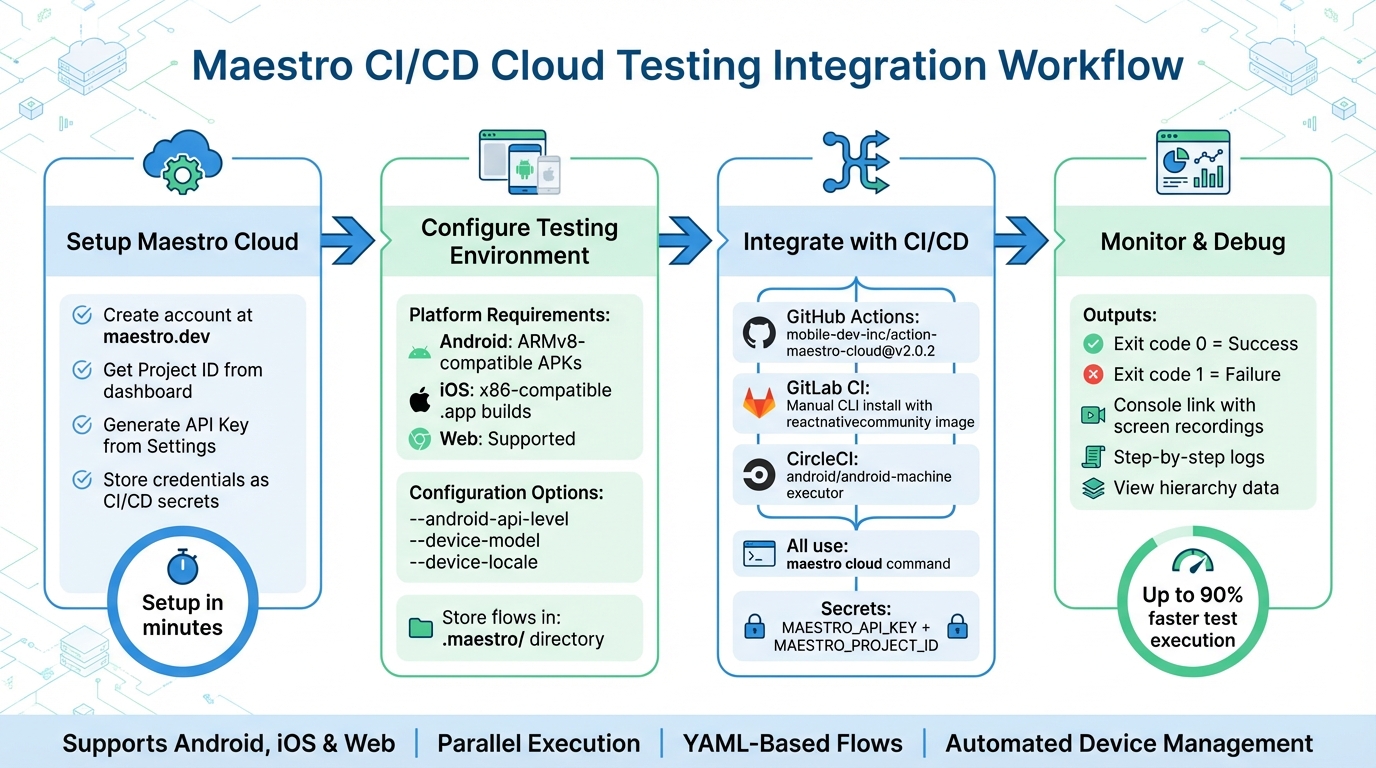
Maestro CI/CD Cloud Testing Integration Workflow
Live Demo + Q&A: Automate Mobile & Web Testing with Maestro
sbb-itb-e343f3a
Setting Up Maestro for Cloud Testing
Get your Maestro Cloud environment ready by creating an account, setting up credentials, and configuring your device settings. Follow these steps to get started.
Creating a Maestro Cloud Account
Head over to maestro.dev and sign up for a free Cloud Plan. You can register in just a few minutes using your email or GitHub account. Once you're logged in, go to your dashboard to find your Project ID - you'll need this for all cloud integrations.
To explore cloud execution, activate a free trial directly from the Maestro Dashboard. Then, verify your setup by running the command maestro download-samples in your terminal. This will download a sample app and Flow file, helping you confirm everything is configured correctly.
Configuring Cloud Credentials
After setting up your account, it's time to configure secure credentials for authentication.
Use your API Key and Project ID (available in the Settings menu) to authenticate sessions. It's crucial to store these credentials securely as CI/CD secrets rather than hardcoding them. For example:
-
In GitHub Actions, save them as
MAESTRO_API_KEYandMAESTRO_PROJECT_IDunder repository secrets. -
In CircleCI, use
MDEV_API_KEYandMDEV_PROJECT_IDin your Project Settings.
When running the maestro cloud command, pass these credentials using the --api-key and --project-id flags. This approach eliminates interactive login prompts during automated runs. For instance:
maestro cloud --api-key ${{ secrets.MAESTRO_API_KEY }} --project-id ${{ secrets.MAESTRO_PROJECT_ID }} app-debug.apk .maestro/
Selecting Testing Environments
Maestro Cloud supports Android, iOS, and web platforms, utilizing managed emulators and simulators. Each test run uses isolated virtual devices that are wiped and recreated, ensuring consistent results.
Prepare your app binaries based on platform requirements:
- Android apps must be ARMv8-compatible APKs.
-
iOS apps need simulator-compatible
.appsimulator builds, provided as a directory or zipped file.
Store your test flows in the .maestro/ directory of your repository for automated execution.
To fine-tune your testing environments, use CLI flags:
-
--android-api-levelto specify an Android version (e.g.,30). -
--device-modelfor iOS hardware (e.g.,iPhone-16). -
--device-osto set an iOS version (e.g.,iOS-18-2). -
--device-localefor localized testing (e.g.,en_USorde_DE).
When you run your first cloud command, Maestro will provide a link to the console where you can view uploads, screen recordings, logs, and command outputs. The exit code will indicate the result: 0 for success and 1 for failure, making it easy for CI systems to handle test outcomes.
Integrating Maestro with CI/CD Platforms
Once your Maestro Cloud environment is ready, the next step is to integrate it into your CI/CD pipeline. Whether you're using GitHub Actions, GitLab CI, or CircleCI, the process involves installing the CLI, setting up credentials, and running the maestro cloud command to upload your app and flows. While the integration steps are similar across these platforms, each uses its own YAML syntax.
Using Maestro with GitHub Actions
Start by installing the official action mobile-dev-inc/action-maestro-cloud@v1 in your workflow after the build step. Store your API key as MAESTRO_API_KEY and Project ID as MAESTRO_PROJECT_ID under repository secrets (navigate to Settings > Secrets and variables > Actions).
Here’s an example of a workflow step for building an Android app and running Maestro Cloud tests:
- name: Build Android APK
  run: ./gradlew assembleRelease

- name: Run Maestro Cloud Tests
  uses: mobile-dev-inc/action-maestro-cloud@v1
  with:
    api-key: ${{ secrets.MAESTRO_API_KEY }}
    project-id: ${{ secrets.MAESTRO_PROJECT_ID }}
    app-file: android/app/build/outputs/apk/release/app-release.apk
    workspace: .maestro
This action waits for test results before marking the workflow as passed or failed. If you prefer not to wait, you can add async: true to exit immediately after the upload. You can also focus on specific test subsets using include-tags or exclude-tags. For instance, run only smoke tests for pull requests while reserving full regression tests for nightly builds.
To save time on repeated uploads, reuse the initial app-binary-id output for subsequent runs. You can also pass dynamic test variables using the -e flag, like -e STAGE=prod, making your test files adaptable to various environments.
Integrating Maestro with GitLab CI
For GitLab CI, you’ll need to install the CLI manually, giving you more control over the environment. Add a test stage to your .gitlab-ci.yml file. Use the cimg/openjdk:19.0.1 image for Android builds or a macOS runner for iOS.
Store your credentials as CI/CD variables under Settings > CI/CD > Variables. The CLI will automatically detect these variables without requiring additional flags.
stages:
  - build
  - test

e2e-android:
  stage: test
  image: cimg/openjdk:19.0.1
  before_script:
    - curl -Ls "https://get.maestro.mobile.dev" | bash
    - export PATH="$PATH:$HOME/.maestro/bin"
  script:
    - maestro cloud --api-key $MAESTRO_API_KEY --project-id $MAESTRO_PROJECT_ID android/app/build/outputs/apk/release/app-release.apk .maestro/
  dependencies:
    - build-android
Each run includes a direct link to the Maestro Console in the terminal logs, where you can view screen recordings, command outputs, and hierarchy data. If your runners experience connection timeouts, extend the default wait times by exporting MAESTRO_DRIVER_STARTUP_TIMEOUT=180000 (3 minutes). Keep your flows organized in a single directory like .maestro/ or e2e/ - root files act as main tests, while subdirectories hold reusable subflows called with runFlow.
Setting Up Maestro in CircleCI
CircleCI allows you to streamline workflows by efficiently sharing app binaries between jobs. Use the android/android-machine executor for Android or macOS executors with Xcode for iOS. Add your API key as MDEV_API_KEY and Project ID as MDEV_PROJECT_ID under Project Settings > Environment Variables.
Create a maestro-upload job in .circleci/config.yml that depends on your build job. Use persist_to_workspace in the build job and attach_workspace in the upload job to transfer the app binary.
jobs:
  build-android:
    executor:
      name: android/android-machine
      resource-class: large
    steps:
      - checkout
      - run: cd android && ./gradlew assembleRelease
      - persist_to_workspace:
          root: .
          paths:
            - android/app/build/outputs/apk/release/app-release.apk

  maestro-upload:
    docker:
      - image: cimg/openjdk:19.0.1
    steps:
      - checkout
      - attach_workspace:
          at: .
      - run: curl -Ls "https://get.maestro.mobile.dev" | bash && echo 'export PATH="$PATH:$HOME/.maestro/bin"' >> $BASH_ENV
      - run: maestro cloud --apiKey $MDEV_API_KEY --projectId $MDEV_PROJECT_ID --app-file android/app/build/outputs/apk/release/app-release.apk --flows e2e-tests/

workflows:
  test:
    jobs:
      - build-android
      - maestro-upload:
          requires:
            - build-android
Use named parameters like --apiKey, --projectId, --app-file, and --flows for clarity. If you don’t need immediate test results, add the --async flag to let the CI runner exit right after the upload.
Writing and Managing Maestro Flows
Once your cloud setup and CI/CD integration are in place, the next step is to focus on efficiently managing and organizing test flows.
Structuring Flows for Easy Maintenance
Maestro uses YAML syntax to define test actions, making it straightforward for all team members to understand and contribute. To keep things organized, structure your flows by grouping them into feature-specific subdirectories like auth/, profile/, or checkout/. This makes locating and maintaining flows much easier.
To avoid duplicating steps across flows, use runFlow to reference reusable sequences. For instance, if multiple flows require a login step, define it in subflows/login.yaml and call it wherever needed. This way, any updates to the login logic can be made in a single location.
When selecting UI elements, go for testID first, as it’s the most reliable option. If that’s unavailable, use accessibility labels, and as a last resort, rely on text content, which can be less stable due to localization changes. Instead of hardcoding wait times, utilize waitForElement or waitUntilNotVisible to handle asynchronous loading. This approach minimizes flakiness in your tests. For platform-specific steps or optional dialogs (like permission prompts), use when conditions to adapt flows for both iOS and Android without duplicating logic.
Version Control for Test Files
Keep all Maestro flows in the same Git repository as your application code. This ensures that your tests are always in sync with the features they validate. Maestro treats files in the root directory as standalone tests, while subdirectories are treated as subflows. Subflows only execute when explicitly called via runFlow, preventing unnecessary executions.
Sensitive data, such as API keys or credentials, should never be hardcoded in YAML files. Instead, use environment variables with the ${env.VARIABLE_NAME} syntax. Store these secrets securely as CI/CD environment variables or repository secrets. Assign tags (e.g., smoke, critical, slow) to your flows to streamline execution. For example, you can run only smoke tests on pull requests while reserving full regression tests for nightly builds. This strategy ensures your tests remain efficient and aligned with your app's release schedule.
By syncing test updates with feature changes and using tags to control execution, you can maintain both the integrity and efficiency of your testing pipeline.
Optimizing Test Suites for Cloud Execution
Maestro Cloud allows for high parallelism, enabling multiple flows to run simultaneously and significantly cutting down test cycle times. To save time and bandwidth, avoid re-uploading your app binary for every test run. Instead, capture the app-binary-id during the initial upload and reuse it for subsequent runs.
For larger test suites, make your flows adaptable to different environments by passing dynamic data (like staging URLs) using the env argument. This eliminates the need to modify YAML files for each environment. If you encounter CI connection delays, adjust the MAESTRO_DRIVER_STARTUP_TIMEOUT (default is 15 seconds for Android and 120 seconds for iOS) to prevent startup issues.
Leverage Maestro Studio to inspect the element hierarchy and interactively generate test commands. This tool helps you fine-tune your selectors, reducing maintenance efforts and ensuring accuracy from the start.
| Selector Type | Reliability | Best Use Case |
|---|---|---|
| TestID | Highest | Key interactive elements; stable across localization |
| Accessibility Label | High | Elements already supporting accessibility |
| Text Content | Medium | Simple labels; may break if UI text changes |
| Regex/Partial Text | Medium | Elements with dynamic or slightly varying text |
| Index-Based | Lowest | Use only when identical elements exist |
Monitoring and Debugging Cloud Test Execution
When your tests are running in the cloud, having tools to monitor progress and debug failures is essential for efficiency.
Accessing Test Reports and Logs
Every maestro cloud run generates a direct link to a detailed Console report. This report includes screen recordings, step-by-step logs, and view hierarchy data for each flow. The link is provided immediately after the upload, so you won’t need to dig through dashboards to find your results.
The command also returns exit codes - 0 for success and 1 for failure - enabling CI/CD platforms to flag build statuses automatically.
For apps with obfuscated builds - such as Android apps using ProGuard or R8, or iOS apps with dSYM — you can upload mapping files to get readable stack traces in test results, using the --mapping-file parameter. This makes stack traces and performance logs easier to read, helping you quickly identify issues.
These features allow you to diagnose problems efficiently, which ties into the next section on debugging failed test runs.
Debugging Failed Test Runs
The detailed reports from Maestro Cloud are invaluable for troubleshooting. Start by reviewing the CI runner’s terminal output to locate the Maestro Console link. This link provides a visual playback of the test run, showing exactly where a flow failed and why.
If the Maestro driver fails to start in slower environments, you can adjust the MAESTRO_DRIVER_STARTUP_TIMEOUT setting. By default, this is set to 15 seconds (15,000 ms) for Android and 120 seconds (120,000 ms) for iOS. For particularly slow setups, you can increase this to 180,000 ms (3 minutes).
For quicker debugging cycles, reuse the app-binary-id to skip repeated uploads. This lets you focus on fixing flows without waiting for the same build to upload again. For iOS builds, ensure they target the simulator by using -destination 'generic/platform=iOS Simulator'. Keep in mind that ARM64-only builds are not supported in the cloud.
Integrating Reports with CI/CD Dashboards
To extend test visibility, you can configure Maestro Cloud to push results to external systems via webhooks, Slack, or email notifications. Set these up in the Maestro Dashboard to receive immediate updates when tests complete. These notifications help maintain a continuous feedback loop.
For GitHub users, the official Maestro Cloud GitHub Action can run tests on every push or pull request. Results are displayed directly in the PR interface, creating a natural checkpoint. If tests fail, the PR can be blocked from merging until the issues are addressed.
If you prefer real-time monitoring without waiting for tests to finish, use the --async flag. This allows the CLI to exit immediately after the upload, with results appearing later in the Maestro Console or through notifications. However, for debugging purposes, running in synchronous mode (the default) is often better since it provides instant feedback and proper exit codes for your CI pipeline.
| Feature | Purpose |
|---|---|
| Exit Code 0 | Indicates all flows passed successfully |
| Exit Code 1 | Indicates at least one flow failed |
| Console Link | Direct access to videos, logs, and hierarchy data |
| Mapping Files | Makes stack traces readable for Android (ProGuard) and iOS (dSYM) |
| Webhooks | Sends results to external dashboards or Slack |
Conclusion
Adding Maestro to your CI/CD pipeline makes cloud testing straightforward. With just one maestro cloud command, you can upload your app and test flows to managed devices, eliminating the need for local devices entirely. This single command serves as the foundation for all the benefits it brings.
Maestro's automatic waits and flakiness tolerance help cut down on false failures, while its parallel execution and device isolation speed up feedback loops and improve release quality.. Plus, the declarative YAML syntax makes it simple to update and maintain tests as your app changes.
No matter which platform you’re using - GitHub Actions, GitLab CI, CircleCI, or others - Maestro’s easy setup and support for Android, iOS, and web testing let you get started right away.
Additional features like screen recordings, detailed logs, and standardized exit codes (0 for success, 1 for failure) make debugging faster and keep your pipeline running smoothly. You can begin with Maestro's free local testing and then scale to cloud execution when you're ready to test across multiple devices and operating systems simultaneously.