Flaky tests waste time, delay releases, and erode trust in your testing process. Here’s how to fix them:
- What causes flaky tests? Common issues include timing problems, unstable environments, unreliable locators, shared test data, and concurrency conflicts.
- How to diagnose them? Use the "20-run rule" (run tests repeatedly to check for inconsistencies), analyze logs, and monitor pass rates (anything below 95% is suspect).
- How to prevent flakiness? Write better tests with dynamic waits, stable locators, and independent setups. Avoid hardcoded delays and shared states.
- How to stabilize environments? Use consistent CI configurations (e.g., Docker), manage resources effectively, and mock APIs to handle network variability.
- How to manage flaky tests? Automatically retry failing tests, quarantine flaky ones, and track performance with dashboards and alerts.
Key takeaway: Flakiness often stems from unstable environments or poor test design. Tools like Maestro can help by automatically waiting for elements and handling retries, reducing manual intervention and improving reliability.
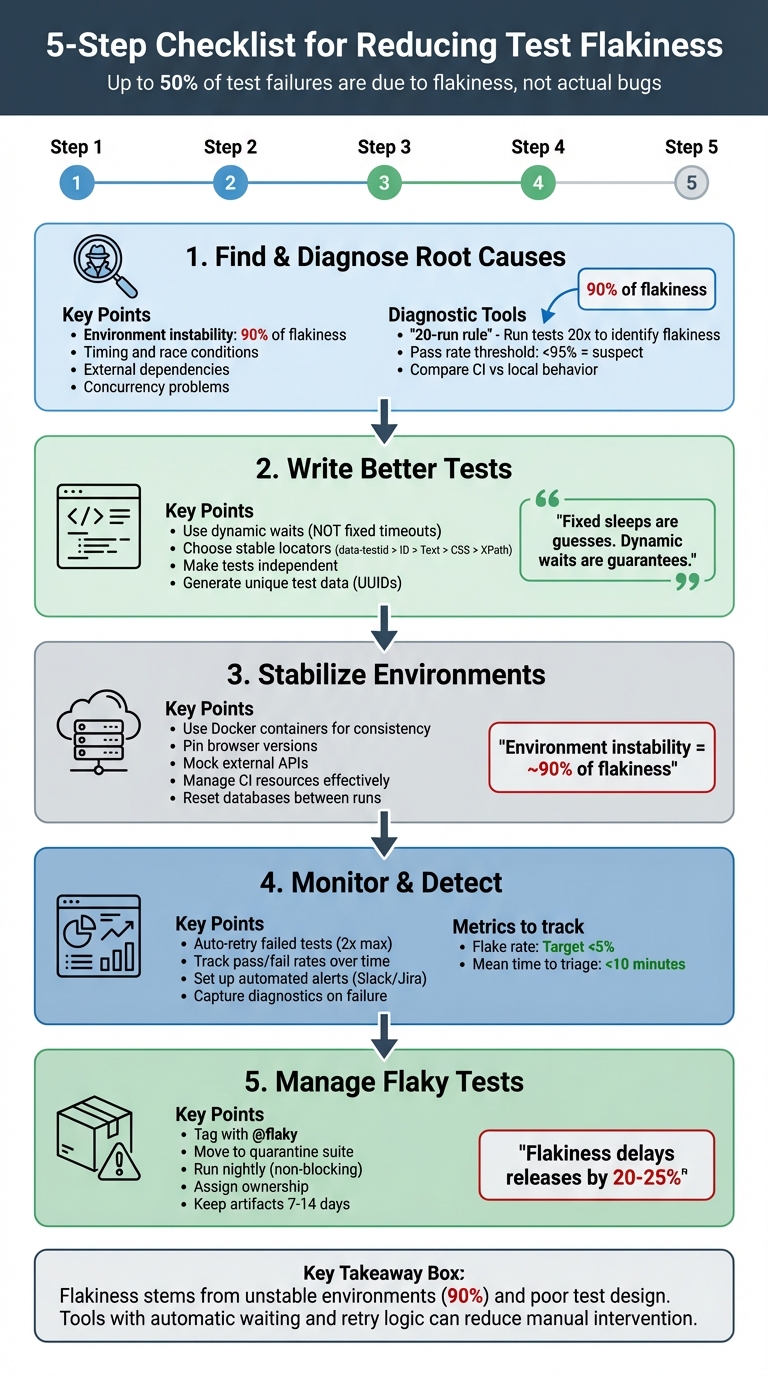
5-Step Checklist for Reducing Test Flakiness in Automation
Finding and Diagnosing the Root Causes
Common Causes of Test Flakiness
Test flakiness often stems from several recurring issues. One major factor is timing and race conditions, such as attempting to interact with elements before JavaScript has fully loaded or verifying text before an API response arrives. These timing mismatches can lead to unpredictable test behavior.
Another significant contributor is environment instability, which accounts for nearly 90% of flakiness. Differences between local machines and CI servers - like hardware variations - can cause tests to time out or behave inconsistently.
External dependencies, like third-party APIs or fluctuating network conditions, also introduce unpredictability. Similarly, ineffective selectors can make tests fragile if they rely on unstable element locators. Issues with test data management arise when multiple tests share the same user account or when data isn't properly reset between runs, leading to conflicts.
Concurrency problems are another challenge. When tests run with parallelism in the cloud but share resources, they can interfere with one another. Lastly, non-deterministic app logic, such as randomized outputs or features tied to specific time zones, can cause tests to fail inconsistently.
Identifying these root causes is crucial for spotting patterns in test failures and addressing them effectively.
Analyzing Failure Patterns
To diagnose flaky tests, the "20-run rule" is a practical approach: run the failing test 20 times without changing the code. If the test passes some of the time, it's likely flaky. If it fails every time, there's probably an actual bug. Comparing test behavior in CI environments versus local setups can also reveal resource-related issues.
Video recordings, HTTP logs, console errors, and network traffic provide valuable clues for pinpointing problems. Scheduling builds at different times of day can uncover whether failures are linked to network congestion or background processes. Additionally, any test with a pass rate under 95% warrants further investigation.
By analyzing these patterns, you can determine whether a failure is due to flakiness or a genuine issue.
Separating Flaky Tests from Real Failures
Once you've analyzed the patterns, it's essential to define criteria for distinguishing flaky tests from real failures.
"A test is flaky if it shows different behavior with the same code under the same environment. Flaky tests are like hidden landmines that can detonate unexpectedly." - Semaphore
Tests that pass upon retry are usually flaky. In contrast, genuine failures occur consistently after a specific change in the code. A stable main branch with a 100% success rate indicates reliability; deviations suggest either a bug or a flaky test.
Interestingly, up to 50% of test failures are due to flakiness rather than actual code issues. Diagnosing these problems saves time and prevents unnecessary debugging. For example, if a test only fails during certain hours, it might indicate an assumption about a specific time zone or reliance on time-sensitive data, like available appointment slots. Recognizing these patterns ensures that flaky tests are addressed appropriately, keeping your test suite reliable.
sbb-itb-e343f3a
How to Deal with UI Test Flakiness – Best Practices for Stable Test Automation
Writing Better Tests to Prevent Flakiness
When it comes to creating reliable tests, the key lies in designing them to resist flakiness from the start. Flaky tests often stem from issues like poorly managed waits, unstable locators, or shared states. By addressing these areas, you can build tests that run consistently, no matter the environment. Let's dive into some effective strategies.
Using Dynamic Waits Instead of Fixed Timeouts
Relying on fixed timeouts like time.sleep() or page.waitForTimeout() can lead to problems. These static delays are nothing more than guesses - they might hold up tests unnecessarily when elements load quickly or cause failures if the environment is slower than expected. For example, a 40-second hardcoded wait is excessive when not needed and unreliable on slower servers.
Dynamic waits, on the other hand, are much smarter. They continuously check for specific conditions, such as an element becoming visible or clickable, and proceed as soon as those conditions are met. This approach eliminates unnecessary delays while ensuring reliability. Modern tools like Playwright take this a step further with auto-waiting, which checks that elements are attached to the DOM, visible, stable, and enabled before interacting with them [3].
"Fixed sleeps are guesses. Dynamic waits are guarantees. Always choose guarantees."
– Autonoma
Dynamic waits not only reduce flakiness but also help tests run faster.
Choosing Stable Element Locators
Using the right locators is crucial for building tests that can handle UI changes. Fragile locators like absolute XPaths (div > span:nth-child(5)) or position-based CSS selectors break easily when the UI layout shifts. Similarly, dynamic IDs that change with every build are unreliable for test automation.
Instead, aim for locators that are stable and tied to the functionality rather than the structure of the UI. Dedicated data-testid attributes are an excellent choice - they remain consistent across changes to styles or HTML. User-facing attributes like roles, labels, or visible text are also reliable options [3].
| Strategy | Stability | Recommendation |
|---|---|---|
| data-testid | Highest | Industry standard; use whenever possible |
| ID / Name | High | Use if the value is unique and constant |
| Text Content | Moderate | Use for assertions based on what users see |
| CSS Class | Low | Avoid, since styling classes change frequently |
| Absolute XPath | Very Low | Avoid; breaks with any layout shift |
To make maintenance easier, centralize locators in a Page Object Model. This way, any updates to a UI element only need to be made in one place, saving time and effort.
Making Tests Independent
Interdependencies between tests can lead to cascading failures, where one failed test affects others. Independent tests are easier to debug, can run in parallel, and help reduce the overall runtime of your test suite.
"If you run a login test that relies on the account from the sign-up test, it won't work predictably since the account isn't guaranteed to exist for the login."
– Dennis Martinez, Freelance Automation Tester
To ensure independence, each test should handle its own state. For example, generate unique identifiers (like UUIDs or timestamps) for test data to avoid conflicts. Use hooks such as beforeEach and afterEach to set up fresh data and clean up afterward. Tools like Playwright simplify this by creating isolated browser contexts for each test, preventing issues with shared cookies or local storage [3].
You can also mock external dependencies using network interception (e.g., page.route()) to simulate API responses. This shields your tests from real-world data changes or external service outages. Designing tests to be idempotent - so they produce the same result every time - further reinforces reliability.
Setting Up a Stable Test Environment
Creating a stable test environment is just as important as designing robust tests when it comes to reducing flakiness. In fact, instability in the environment is responsible for around 90% of test flakiness. If your CI server operates with different browser versions, time zones, or resource allocations compared to your local machine, you’re likely to encounter inconsistent results. The key is to build a predictable and repeatable environment that eliminates these variables. Additionally, addressing network variability is crucial for further stabilizing your setup.
Handling Network Variability
Network conditions can fluctuate significantly between test runs, especially in CI environments. Instead of relying on sleep() commands, use smarter strategies like waiting for network idle states or specific API responses. For instance, wait for a 200 OK response from /api/user before proceeding with actions that depend on that data.
Another effective approach is network mocking, which allows you to simulate external dependencies. This shields your tests from real-world API delays or outages [3]. If you encounter temporary network issues, implement exponential backoff for retries on specific operations rather than rerunning the entire test suite.
Managing Test Execution Resources
Resource allocation plays a big role in test stability, especially on CI servers, which often run on less powerful machines. As Dennis Martinez, a Freelance Automation Tester, explains:
"Most CI services use lower-powered servers with significantly fewer available resources than the average developer's or tester's computer, and the difference between these slower systems can introduce an element of flakiness".
Resource-heavy browsers can time out on machines with limited CPU or memory. To avoid bottlenecks, consider distributing your tests across multiple machines using tools like Selenium Grid or cloud-based infrastructure. When scaling parallel execution in CI, start with a single worker and gradually increase the count once your test suite demonstrates stability [3]. Additionally, keep a close eye on system health logs (CPU and RAM usage) to identify resource contention before it leads to failures.
Setting Up CI/CD Pipelines Correctly
Differences between local and CI environments are a common cause of flaky tests. To address this, use Docker containers or pin browser versions to ensure consistency and prevent version mismatches [3]. Configure your pipeline to reset databases or application states to a clean slate before each run. Using unique identifiers, such as UUIDs, for test data can help avoid collisions.
To manage storage efficiently, configure your CI system to capture diagnostic artifacts (like traces, screenshots, and videos) only on failures or retries [3]. Implement a limited number of automatic retries (e.g., 2) for transient issues, but make sure to flag these as "flaky" rather than "passed" to avoid masking genuine problems [3]. For tests that fail repeatedly, tag them with @flaky and move them to a separate nightly pipeline so they don’t block deployments [3].
| CI/CD Category | Anti-Pattern | Best Practice |
|---|---|---|
| Retries | Blindly rerunning the whole suite | Configured auto-retries for specific failures [3] |
| Artifacts | Guessing from raw console logs | Capturing traces, video, and screenshots on failure [3] |
| Isolation | Shared state/databases across runs | Isolated, idempotent data seeded for each test [3] |
| Environment | "Works on my machine" (Local vs CI) | Using Docker or pinned browsers to avoid drift [3] |
| Triage | Ignoring failures until they snowball | Quarantining flaky tests and assigning owners [3] |
Monitoring and Managing Flaky Tests
Once you've stabilized your testing environment, the next step is to keep a close eye on flaky tests and manage them effectively. Flaky tests can waste valuable time by triggering false alarms, diverting your team from addressing real bugs. A structured approach helps prevent unnecessary distractions and keeps your testing process reliable.
Detecting Flaky Tests Automatically
The best way to spot flaky tests is by setting up your CI/CD pipeline to automatically retry failed tests. If a test fails on the first attempt but passes on a retry, it should be marked as "flaky" to avoid misinterpreting the results [3]. As Pratik Patel from TestDino puts it:
"The flaky status is a huge signal that a test is unreliable and needs a closer look, even if it didn't fail the build." [3]
A good practice is to configure your CI to retry failed tests twice. This helps differentiate between flaky tests and actual failures [3]. Additionally, track the pass/fail rates of your tests over time. Any test with a success rate below 95% should be flagged for further investigation. For tests suspected of being flaky, running extra iterations can confirm whether the failures are intermittent. Once identified, the next priority is to isolate flaky tests to avoid disrupting your deployment flow.
Isolating Flaky Tests
When a test is flagged as flaky, it’s important to ensure it doesn’t interfere with deployments. Tagging these tests with @flaky and moving them to a non-gating quarantine suite that runs nightly is a common approach [3]. This keeps the test active for data collection but prevents its failures from blocking pull requests or deployments.
For newly added or suspicious tests, consider running them multiple times - up to 100 iterations - in a sandbox environment before merging them into the main suite. This "burn-in" process helps identify stability issues early. As Keith Johnson from Rainforest QA explains:
"Moving tests that produce inconsistent results into a separate test run group... restores confidence in the rest of your test suite."
Setting Up Automated Alerts and Reports
To maintain oversight, automate notifications and reporting. Manual monitoring isn’t practical when running thousands of tests daily. Integrate your CI/CD pipeline with tools like Slack or Jira to send instant alerts and auto-generate detailed bug tickets. These tickets should include failed steps, screenshots, HTTP logs, and video recordings for easy debugging [3].
Dashboards like CircleCI Test Insights or Telerik Executive Dashboard can provide a clear view of job statuses, failure patterns, and slow-running tests. Aim for a flake rate under 5% and a mean time to triage (MTTT) under 10 minutes to maintain a healthy test suite [3]. Set aside time each week to review dashboards, remove outdated tests, and assign ownership for recurring issues [3]. To support debugging, keep diagnostic artifacts like traces and video recordings for 7–14 days before purging [3].
Using Maestro to Reduce Test Flakiness

Why Maestro Helps Reduce Flakiness
Maestro directly addresses one of the biggest challenges in testing: flakiness. Instead of relying on manual fixes like handling delays or unstable UI elements, Maestro builds tolerance into its core functionality. It automatically waits for elements to load and retries actions when necessary, tackling a major source of flakiness - environment instability. Interestingly, flakiness often stems more from unstable environments than actual code changes and can take up an estimated 40% of a QA team's time. To combat this, tests need to handle factors like dynamic loading, API delays, and rendering cycles effectively.
One of Maestro's standout features is its ability to eliminate fixed sleep() calls, waiting only as long as required. This dynamic approach aligns perfectly with earlier strategies for better test design and environment setup, ensuring smoother and more reliable testing processes.
Maestro's Main Features
Beyond reducing flakiness, Maestro simplifies test creation and execution with a user-friendly approach. By using straightforward YAML files to define test flows, it minimizes the risk of unexpected behavior in test code. For example, a basic flow might include launching an app, interacting with a search field, entering text, selecting a result, and verifying that the correct screen appears. Thanks to its declarative syntax, team members can easily update tests without needing advanced programming skills.
Maestro supports testing across Android, iOS, and web platforms, including native apps, React Native, Flutter, and WebViews. For teams without coding expertise, Maestro Studio offers a free desktop app with AI-assisted visual test creation, removing the need for command-line tools or coding knowledge. Additionally, since tests are interpreted rather than compiled, you can monitor changes and rerun them instantly, significantly speeding up iteration cycles.
Configuring Maestro to Handle Flaky Scenarios
Maestro also shines when it comes to handling tricky, flaky scenarios. Instead of relying on static delays, the framework uses automatic waiting to adapt to real-time conditions. For more precise control, conditional waits can confirm specific elements or states before proceeding. When selecting elements, targeting stable attributes like dedicated test IDs ensures better reliability than using CSS selectors or position-based paths, which can easily break with layout changes.
For critical workflows affected by network delays or slow APIs, retry logic ensures consistent results[3]. Maestro's environment management feature makes it easy to switch between development, staging, and production environments without rewriting tests. To further ensure stability, run new or questionable tests multiple times in a sandbox environment before adding them to your main test suite. This approach helps identify and address potential issues early, aligning with best practices for maintaining stable and reliable tests.
Conclusion: Building a Reliable Testing Process
Creating dependable automation requires a combination of solid test design, stable environments, and proactive monitoring. By following a three-level strategy, you can significantly cut down flakiness: update test code with dynamic waits and stable locators, run tests in reproducible CI/CD environments that capture diagnostic artifacts, and quarantine flaky tests while assigning clear ownership[3]. This structured approach ensures your tests provide meaningful insights instead of adding noise to the process.
Flakiness is a major pain point, contributing to 50% of all test failures and delaying product releases by 20% to 25%. As Arpita Goala from Testlio aptly puts it:
"Flaky tests are the bane of every developer and quality assurance engineer's existence. One day, they pass, the next they fail - without any changes to the code".
The damage caused by flaky tests goes beyond wasted time - they erode trust in your automation suite, making deployment decisions less about data and more about guesswork.
This is where tools like Maestro step in. Maestro tackles flakiness with features like automatic waiting, built-in retry logic, and a declarative YAML syntax that reduces test code complexity. Whether you're using the open-source CLI or the AI-powered Maestro Studio for visual test creation, the platform is designed to handle the inherent instability of mobile and web applications, letting your team focus on building features instead of fighting flaky tests.