Flaky tests - those that pass and fail unpredictably - can slow down your development process and erode trust in your test results. They often arise from timing issues, like interacting with UI elements before they’re ready or dealing with network delays. Common fixes like sleep() calls can waste time and inflate CI/CD costs.
Here’s the good news: frameworks with built-in tolerance mechanisms can solve these problems. They automatically handle delays, retries, and UI shifts, making your tests more reliable without adding manual timing logic. For example, tools like Maestro manage waits, animations, and network variability, ensuring your tests run smoothly across environments.
Key Takeaways:
- Flaky tests often result from timing mismatches, animations, or network variability.
-
Manual fixes like
sleep()calls can add unnecessary delays. - Built-in tolerance mechanisms automate waits, retries, and screen stability checks.
- Tools like Maestro simplify test creation with YAML syntax and adaptive timing.
How to handle flaky tests: 5 quick solutions #AskRaghav
sbb-itb-e343f3a
What Are Flaky Tests and Why Do They Happen?
A flaky test is an automated test that produces inconsistent results despite no changes to the code. It might pass during one run and fail during another, even though the application remains the same. This inconsistency often becomes evident when tests pass reliably on a local machine but fail sporadically in a CI/CD pipeline. The main culprit? Timing issues. For instance, a test might attempt to interact with a button before it has fully rendered or check for text before a network request has completed, leading to a race condition. Pinpointing these causes is key to building more resilient test strategies.
Main Causes of Flaky Tests
One of the biggest contributors to flaky tests is performance differences between environments. A test might time out waiting for an element to appear because the CI infrastructure runs on different hardware compared to a developer's local machine. These performance gaps create mismatched execution timelines.
Animations and loading states in modern applications also play a role. Features like skeleton loaders, infinite shimmers, or video backgrounds can make it difficult for a test to determine when a screen has fully loaded. As a result, the test may try to interact with elements that aren’t ready, leading to failures.
Third-party SDKs add another layer of unpredictability. Services like Firebase, Facebook Login, or Google Maps often require background initialization. Even if an element appears visible on the screen, the SDK might still be processing, causing actions like taps or swipes to fail.
Network variability is another factor. While local tests often rely on mocked API responses that return instantly, CI environments frequently interact with live endpoints. This introduces unpredictable latency, meaning assertions might execute before the necessary data is available, resulting in failures even when the app itself is functioning correctly.
Finally, real devices introduce additional challenges. Unlike emulators, real hardware can add 50–200 milliseconds of latency to touch events. Other factors like thermal throttling, background processes, and CPU variations can slow down responses, making tests that pass on emulators fail on physical devices.
These challenges highlight the importance of creating test flows that can adapt to different conditions and environments.
How Flaky Tests Affect Your Testing Process
Flaky tests don’t just disrupt individual test runs - they erode trust in your entire testing process. When tests fail randomly, teams may start ignoring test results altogether, increasing the risk of real bugs slipping through unnoticed.
This unpredictability also comes with a cost. To stabilize flaky tests, teams often resort to adding manual sleep calls, retry logic, or duplicate assertions. While these workarounds can help, they also slow down test execution. For example, in a suite of 50 tests, these fixes might add 16 extra minutes of runtime, turning what should be a 10-minute process into a 26-minute ordeal. This not only inflates CI/CD costs but also delays developer feedback loops.
Longer test runs mean developers wait longer to find out if their changes introduced any issues. Meanwhile, QA teams spend more time investigating why tests fail in CI but pass locally, leaving less time to create new test coverage. This shift in focus can lead to growing technical debt, as teams prioritize debugging over innovation.
To address these issues, integrating tolerance mechanisms into your tests can help manage timing challenges and adapt to changing conditions automatically, reducing the burden on developers and QA teams alike.
Built-In Tolerance Mechanisms Explained
How Maestro's Built-In Tolerance Mechanisms Prevent Flaky Tests
Built-in tolerance mechanisms allow test frameworks to handle the unpredictable nature of mobile and web applications by automating delays and managing UI shifts. This eliminates the need for hardcoded delays or manual retry logic, making tests easier to maintain and more reliable across different environments.
The idea is straightforward: work with instability instead of resisting it. Mobile devices and web apps are naturally unpredictable - network requests can vary in speed, animations depend on hardware performance, and UI elements may not always render in the same spot. Built-in tolerance shifts the burden of managing these variations from developers to the framework itself.
These mechanisms directly address the common causes of flaky tests, such as performance differences, animation delays, network variability, and device-specific latency.
Automatic Wait Strategies
Automatic wait strategies replace static sleep() calls with smarter, adaptive waiting that aligns with application behavior. When a test interacts with an element, the framework automatically waits for it to become available - but only for as long as necessary.
Unlike manual waiting, automatic strategies are flexible, not fixed. For example, a static sleep(3000) always waits three seconds, even if the element appears earlier. In contrast, automatic waits poll for the element and move forward as soon as it's ready. If an element loads quickly in a local environment, the test proceeds immediately. If it takes longer in a slower CI environment, the framework waits - up to a reasonable timeout.
One effective approach is assertion-based waiting. Instead of explicitly telling the framework to wait, you simply assert that an element should be visible. The framework handles the rest, checking for the element within a set time window (typically 5–10 seconds). This keeps test code clean and focused while still accommodating delays.
For instance, Maestro uses a hardcoded element lookup timeout of 17 seconds. When you write an assertion like assertVisible: "Submit Button", Maestro searches for the button for up to 17 seconds before failing. It also includes logic to handle animations, waiting up to 2 seconds (10 iterations of 200 milliseconds each) for screen pixels to stop changing. This prevents tests from interacting with elements while transitions are still happening.
"Maestro knows that it might take time to load the content (i.e. over the network) and automatically waits for it (but no longer than required)." - Maestro Documentation
This approach eliminates the common "scattershot" method of adding arbitrary sleep calls. Instead of guessing that a screen will load in three seconds with sleep(3000), you let the framework decide when the screen is ready. The result? More reliable and faster test execution.
Next, these frameworks address unpredictable UI behavior with retry strategies.
Handling Unstable UI Elements
Beyond automatic waits, built-in tolerance mechanisms tackle unpredictable UI behavior with retry logic. Dynamic content loading might cause a button to shift slightly, device latency might prevent a tap from registering, or an animation might temporarily obscure an element. Retry logic ensures these issues don’t cause unnecessary test failures.
Retry logic is especially critical for touch interactions. On real devices, touch events can introduce 50–200 milliseconds of latency compared to emulators. If a tap action fails on the first try, the framework retries it, preventing failures caused by minor timing or positioning issues.
Animation management is another key feature. Many modern apps use skeleton loaders, shimmer effects, or video backgrounds, which can interfere with detecting elements. Built-in mechanisms automatically wait for animations to finish before executing the next command. For example, Maestro uses a screenshot difference threshold of 0.5% (0.005) to determine whether a screen has settled. If pixel changes exceed this threshold, the framework waits until the screen becomes static.
For more complex scenarios, such as infinite shimmer animations or long-running videos, frameworks may provide specific commands to handle these cases. However, the goal is to minimize the need for such exceptions by making default behaviors robust enough to handle most situations. This allows test scripts to stay focused on user flows rather than technical details of UI rendering.
Configuration options also help manage instability across environments. Tests that run smoothly on a developer’s machine may face challenges in slower CI/CD environments. Built-in tolerance mechanisms often include settings to handle these differences. For example, Maestro’s default driver startup timeout is 15 seconds, but this can be adjusted for slower environments by increasing the MAESTRO_DRIVER_STARTUP_TIMEOUT value to something like 60,000 milliseconds.
How to Design Reliable Test Flows
When designing test flows, it's essential to break them down into smaller, self-contained units, such as "Login" or "Checkout", rather than creating large, all-encompassing scripts. Each flow should focus on a single user action or sequence. This approach makes it easier to pinpoint issues and update tests when your application changes.
The cornerstone of this strategy is isolation. By isolating flows, you eliminate dependencies on leftover states from previous tests, which reduces flakiness. For instance, every flow should be able to run on a freshly reset device. If your "Checkout" flow assumes the user is already logged in from a prior test, it could fail unpredictably. Instead, you can use nested flows with the runFlow command to reuse common sequences, like logging in, across multiple scenarios. This keeps your tests clean and avoids unnecessary duplication.
Using declarative syntax can further simplify the design of these modular and reliable flows.
Using Declarative Syntax
Declarative syntax allows you to specify what should happen in your tests without worrying about how it happens. In Maestro, for example, tests are written in YAML files using commands like tapOn and inputText. These commands automatically manage waits, retries, and element detection, so you don’t have to handle those details manually. You also don’t need to write explicit wait logic or initialize drivers - the framework takes care of it.
This simplicity makes tests more accessible to your entire team. For instance, a flow to log into an app might look like this:
-
launchApp -
tapOn: "Login" -
inputText: "user@example.com" -
tapOn: "Submit" -
assertVisible: "Welcome"
This eliminates unnecessary boilerplate and avoids compilation delays. Since YAML files are interpreted rather than compiled, you can edit and rerun them immediately, speeding up debugging and adaptation.
Declarative syntax also centralizes your test configurations. For example, a config.yaml file can disable system animations on both iOS and Android, reducing issues caused by transition effects. You can also use it to define execution order, filter tests by tags for specific environments, and set global timeouts - all without modifying individual test files. This approach enables faster, more efficient test management.
Building Modular Test Scenarios
To maintain flexibility, organize your tests into modular components. Group related flows into folders and use config.yaml to control which subsets run during specific test cycles, like smoke tests or full regressions. For instance, you can tag critical flows like "Login" and "Checkout" with smoke and run only those on every commit, while reserving more extensive tests for nightly builds.
Use commands like assertVisible to let the framework automatically wait for elements to appear within the standard timeout window. For exceptions - such as waiting for a video to finish or dealing with slow network responses - you can use extendedWaitUntil with a custom timeout. However, reserve this for rare cases to keep your tests streamlined.
When tests have dependencies, like setup flows that must run first, you can control the execution order in config.yaml. You can also set continueOnFailure: false to halt the suite if a critical setup step fails. This prevents a domino effect where multiple tests fail because of one unresolved issue.
How Maestro Prevents Flaky Tests
Maestro is designed to tackle the challenges of instability in mobile and web test automation. Instead of requiring you to manually address every timing hiccup or UI inconsistency, the framework automatically handles mobile-specific issues. By building on lessons learned from earlier testing tools, Maestro simplifies the process while keeping the effective elements intact. It addresses common causes of flaky tests - like network delays, animation disruptions, and shifting element positions - so you can focus on creating better tests, not troubleshooting them.
Built-In Tolerance for Flakiness and Delays
Maestro’s built-in mechanisms are designed to adapt to real-world testing scenarios. For instance, when you interact with an element, the framework doesn’t assume it will respond instantly. Instead, it retries and waits until the element is ready, with a default timeout of about 17 seconds. Similarly, animations are accounted for using a "settle logic" that pauses for up to 2 seconds (broken into 200-millisecond intervals) to ensure the screen is stable before moving to the next step.
Network delays are handled just as smoothly. Instead of making you guess how long to wait for content to load, Maestro automatically waits up to the defined timeout. Commands like assertVisible act as intelligent waits, checking for an element’s presence for 5–10 seconds, depending on the scenario. The framework also allows you to adjust the driver startup timeout (default is 15 seconds) by setting the MAESTRO_DRIVER_STARTUP_TIMEOUT environment variable, which is particularly useful in CI/CD pipelines with limited resources.
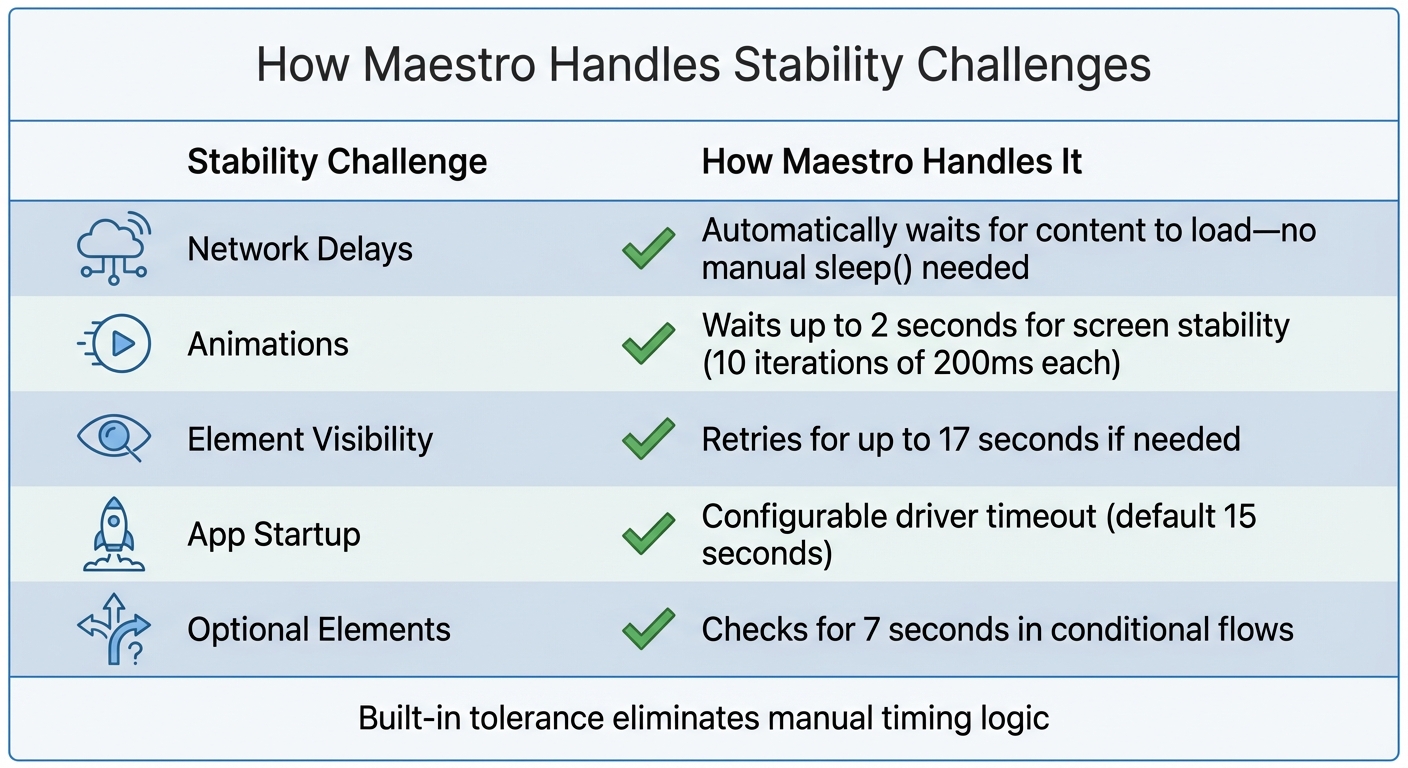
| Stability Challenge | How Maestro Handles It |
|---|---|
| Network Delays | Automatically waits for content to load - no manual sleep() needed |
| Animations | Waits up to 2 seconds for screen stability |
| Element Visibility | Retries for up to 17 seconds if needed |
| App Startup | Configurable driver timeout (default 15 seconds) |
| Optional Elements | Checks for 7 seconds in conditional flows |
These features create a smoother, more reliable testing process.
Declarative Syntax and Fast Iteration
Maestro uses YAML-based test definitions, focusing on what you want to achieve rather than how to implement it. This declarative style eliminates the need for repetitive code and driver setup, making test creation more straightforward. Since the tests are interpreted rather than compiled, you can edit a YAML file and rerun it instantly - no build step required.
The framework also supports hot reloading, allowing you to quickly debug and refine tests. To further reduce flakiness caused by animations on iOS and Android, you can disable system animations entirely by setting disableAnimations: true in your config.yaml file.
Cross-Platform Support and Simple Setup
Maestro extends its automation capabilities across multiple platforms, including Android (Views and Jetpack Compose), iOS (UIKit and SwiftUI), React Native, Flutter, and web applications. The same YAML syntax works across all these environments, streamlining test maintenance and boosting reliability.
Getting started is easy: Maestro is distributed as a single binary that you can install anywhere. Just run curl -Ls "https://get.maestro.mobile.dev" | bash to install the CLI and start testing immediately. If you prefer a visual interface, Maestro Studio offers a desktop app for creating and running tests without needing to touch the command line. It includes tools like an element inspector for finding selectors and an element inspector and command suggestions to help you write test commands as you interact with your app. Both the CLI and Studio are free and open-source for local use, with cloud options available for scaling and parallel execution.
Conclusion
Flaky tests are more than just an annoyance - they waste time and undermine trust in your testing process. The issue often isn't the test itself but the unpredictable nature of mobile and web environments. UI elements can shift unexpectedly, animations interfere, and network delays throw off timing. Without tools to handle these quirks, teams often resort to manual fixes like hardcoded sleep() calls. These fixes, while quick, come at a cost - adding as much as 16 minutes to a 50-test suite.
The solution? Built-in tolerance. Instead of guessing wait times or manually adjusting for shifting elements, a testing framework with built-in adaptability can handle these challenges for you. It retries interactions, waits for content to load, and accounts for animations automatically. This approach removes the need for manual tweaks, keeping your test suite efficient and easy to maintain.
Maestro is a great example of this in action. It incorporates automatic waits - up to 17 seconds for element lookups - and a 2-second settle time for animations. It also offers configurable timeouts for CI/CD environments. With its declarative YAML setup, you can quickly make edits and rerun tests without hassle. These features simplify test creation while ensuring your workflow remains reliable and robust.
If you're tired of dealing with flaky tests, consider trying Maestro. Install the Maestro CLI with curl -Ls "https://get.maestro.mobile.dev" | bash, or explore Maestro Studio for a visual, no-code way to create tests. Both options are free and open source for local testing, with cloud execution available when you're ready to scale.
Reliable tests lead to faster releases and earlier bug detection. By shifting from reactive troubleshooting to a proactive, stable process, you create a testing framework you can depend on. With consistent results, you’ll spend less time debugging and more time focusing on what matters - delivering quality software.