
Flaky tests are a major headache for QA teams. They pass or fail unpredictably, wasting time and resources. Here's how to tackle them effectively:
- Use Dynamic Waits: Replace fixed sleeps with smart waits that respond to conditions like element visibility or network activity.
- Choose Stable Selectors: Rely on consistent IDs or content descriptions instead of fragile options like XPath or screen coordinates.
- Mock External APIs: Replace live API calls with predictable, local responses to avoid delays and failures caused by external dependencies.
- Maintain Isolated Test Environments: Prevent shared resources or leftover data from causing inconsistent results.
- Leverage Maestro's Flakiness Tolerance: Use built-in features like automatic waits and retries to handle timing issues effortlessly.
- Capture Logs and Media on Failures: Collect logs, screenshots, and videos for faster debugging.
- Set Up Automatic Retries: Target transient failures with retries to minimize disruptions.
- Quarantine Flaky Tests: Separate unreliable tests to protect stable ones and assign ownership for fixes.
- Run Iterations to Confirm Issues: Repeated test runs help identify timing-related problems.
- Track Pass/Fail Rates: Monitor success rates and flag tests with less than 95% reliability for attention.
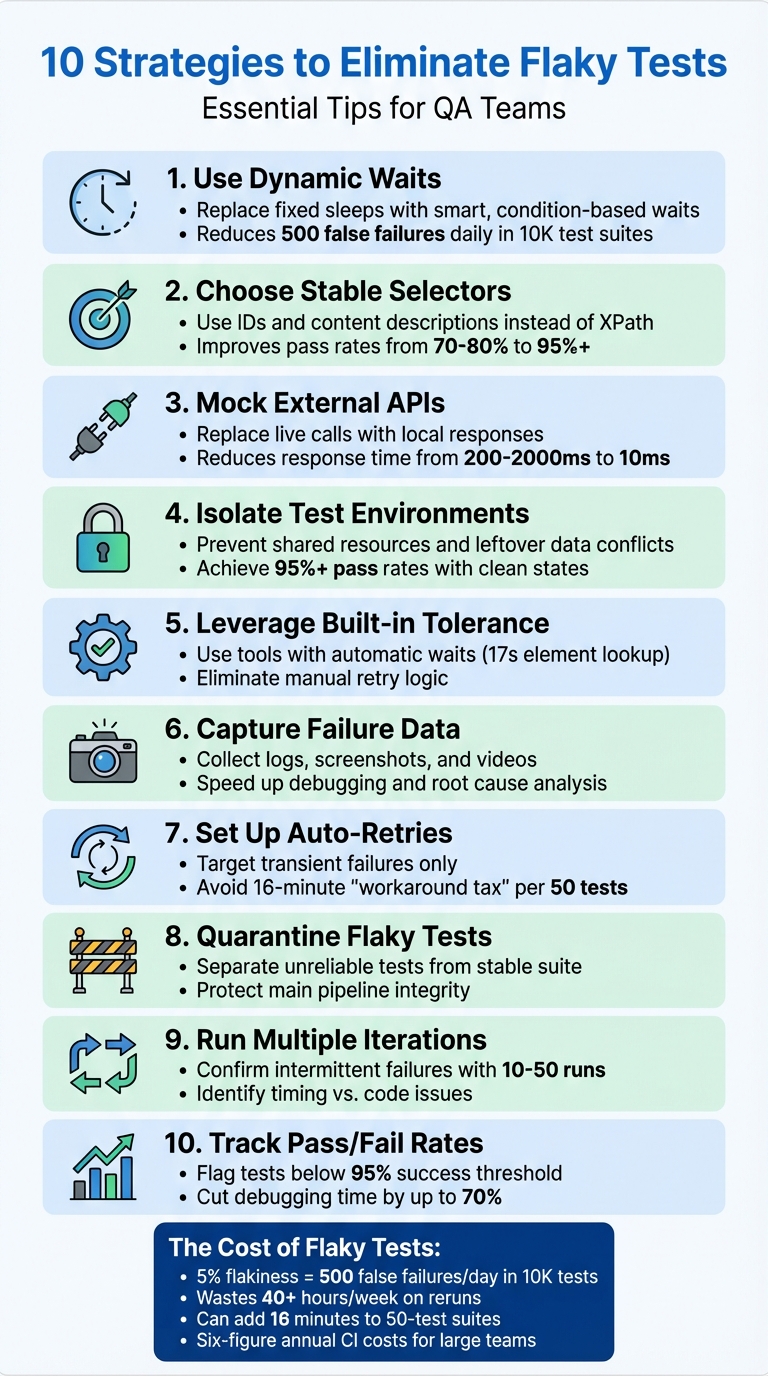
10 Essential Strategies to Eliminate Flaky Tests in QA
1. Use Dynamic Waits Instead of Hard-Coded Sleeps
How it reduces test flakiness
Hard-coded sleeps force tests to pause for a set duration, regardless of how quickly or slowly a page loads. This approach wastes time when pages load faster than expected and causes timeouts when they load more slowly. It’s a lose-lose situation.
Dynamic waits, on the other hand, make tests smarter. Instead of waiting for an arbitrary amount of time, they pause only until a specific condition - like an element becoming visible or network activity settling - has been met. Once the condition is satisfied, the test moves forward immediately, saving time and reducing errors.
How easy it is for QA teams to implement
Replacing static sleeps with dynamic waits is simpler than it sounds. Most modern testing tools already include built-in utilities for this purpose. For example, instead of relying on a generic waitForTimeout, you can use methods like findBy with automatic retries or commands such as page.waitForLoadState("networkidle") to ensure all background processes are completed before proceeding.
This approach allows QA teams to wait for specific conditions rather than fixed durations, making tests more precise. For API-heavy workflows, a "wait-for-response" strategy ensures smooth execution, avoiding race conditions without resorting to globally extended timeouts that can hide deeper performance issues.
Effect on test stability and reliability
Even a small flakiness rate can cause big headaches. For instance, a 5% flakiness rate in a suite of 10,000 tests results in 500 false failures every day, wasting over 40 hours each week on reruns. Dynamic waits tackle this problem by making tests more predictable and consistent, cutting down on unnecessary failures and improving overall reliability.
"Hardcoded timeouts can lead to flakiness, especially in environments where execution speed might vary. Use dynamic waits, such as waiting for specific conditions to be met rather than a fixed period where possible." - TestRail
sbb-itb-e343f3a
2. Use Stable Selectors Like IDs and Content Descriptions
How It Reduces Test Flakiness
Stable selectors, like IDs (e.g., android:id="@+id/login_button") and content descriptions (e.g., content-desc="Submit form"), provide consistency across app updates. Unlike fragile options such as XPath or screen coordinates, these selectors are less prone to breaking when the UI changes - whether due to layout adjustments, animations, or varying screen sizes.
Selectors based on position or dynamic text often result in false negatives, leading to unreliable tests. By focusing on stable attributes, QA teams can create tests that hold up against UI modifications, saving time and effort in the long run.
How Easy It Is for QA Teams to Implement
Switching to stable selectors is straightforward. QA teams can inspect UI elements to find unique IDs or accessibility attributes and then update their test scripts. For instance, using Maestro YAML commands like tapOn: "unique-id-or-content-desc" makes targeting stable elements simple. An example might look like tapOn: "login_button", which uses a stable identifier to minimize failures caused by UI updates.
Tools like Maestro Studio make this process even easier. Its visual inspector allows users, even those without a coding background, to drag and drop elements to quickly create reliable selectors.
Effect on Test Stability and Reliability
Using stable selectors can significantly improve test reliability, increasing pass rates from 70–80% to over 95% by cutting down locator-related issues. This enhancement reduces unnecessary retries, streamlines the CI/CD pipeline, and saves valuable debugging time.
3. Mock External Dependencies and APIs
How It Reduces Test Flakiness
External dependencies can wreak havoc on test stability. When your tests depend on live third-party APIs, databases, or services, you're essentially inheriting their potential issues. Things like network delays, server timeouts, service outages, or rate limits can cause tests to fail sporadically - even when your application code is flawless.
Mocking solves this by swapping live network calls with local stubs that deliver consistent, pre-defined responses. This ensures your tests remain unaffected by external factors, creating a controlled and predictable testing environment. Mocked APIs are also much faster - responding in about 10ms compared to the 200–2,000ms delay of live APIs. This speed eliminates timing issues, such as tests searching for UI elements before data is fully loaded.
"Flaky tests are like unwelcome ghosts in the machine - appearing and disappearing unpredictably and undermining the reliability of your testing suite." - Deepika Kale, Staff Software Engineer in Test, TestRail
By using mocks, you avoid delays caused by unpredictable external SDK initialization times. This approach ensures smoother, more reliable test execution.
How Easy It Is for QA Teams to Implement
Mocking tools make setup straightforward. Frameworks like WireMock for HTTP services, Mockito for Java, or Sinon.js for JavaScript make it easy for teams to replace live API calls with predictable responses. These tools work by intercepting network requests and returning pre-configured JSON responses instead of reaching out to real endpoints.
QA teams can also reduce reliance on full end-to-end (E2E) tests by shifting some scenarios to integration-style unit tests that mock server-side API calls. These tests are faster, simpler to maintain, and still provide meaningful insights. For teams using Maestro, its built-in handling of delays eliminates the need for adding manual waits, ensuring consistent and reliable test results.
Effect on Test Stability and Reliability
The improvement in reliability is dramatic. Imagine a team running 10,000 automated tests daily with a 5% flakiness rate. That translates to 500 false failures every single day. If rerunning each flaky test wastes five minutes of an engineer's time, this adds up to over 40 hours of lost productivity each week - essentially an entire engineer's work week spent on unnecessary tasks.
4. Keep Test Environments Clean and Isolated
How It Reduces Test Flakiness
Keeping test environments clean and isolated plays a major role in cutting down on flaky tests. Shared environments often lead to unpredictable test failures. Why? Because when multiple tests share the same space, they compete for resources, leave behind leftover data, and create dependencies that can make tests fail based on execution order rather than actual bugs. For instance, one test might accidentally delete shared data or cause conflicts in database records.
By isolating environments, you can avoid these headaches. Each test gets its own dedicated setup, free from interference. Using setup and teardown routines ensures every test starts with a clean slate and leaves no residual data behind. Tools like Docker containers are especially helpful here, as they create isolated environments and sidestep issues caused by different system configurations.
How Easy It Is for QA Teams to Implement
The good news? Implementing clean and isolated environments isn’t as hard as it sounds. Most modern testing frameworks already include setup and teardown functions that make it easy to create and clean up test data. If you’re using Maestro, the platform simplifies this even further. Its YAML-based flows and visual tools in Maestro Studio make it accessible, even for QA team members without technical expertise.
For teams with CI/CD pipelines, automation takes this process to the next level. Pipelines can handle containerization, ensuring every test run starts in a consistent, isolated setup without manual effort. The trick is to start small - begin with setup and teardown routines, and then gradually incorporate containerization as your team gets more comfortable with it.
Effect on Test Stability and Reliability
The impact on test stability is huge. Isolated environments mean tests are no longer affected by execution order or environmental drift, leading to consistent results across runs. Teams often see a sharp drop in flakiness when they eliminate issues like resource contention and shared states. For example, by using mocks to control variables like API responses and keeping data states clean, many QA teams have seen pass rates climb above 95%.
Isolated environments also make debugging faster by eliminating environmental noise, which ties directly into identifying root causes - a topic we’ll dive into next.
Support for Debugging and Finding Root Causes
Isolation doesn’t just improve stability; it also makes debugging a lot easier. When tests run in a controlled and predictable environment, failures are more likely to reveal actual issues in the test logic or the application itself, rather than being caused by environmental noise. Isolated setups generate detailed logs that make it easier to spot timing issues or data conflicts.
And when you need to run retries? Doing so in the same isolated environment helps confirm whether a failure is genuine. This is especially helpful for investigating tests that flake around 30% of the time or more. By ruling out environmental factors, you can zero in on the real problem faster.
5. Use Maestro's Built-in Flakiness Tolerance
How It Reduces Test Flakiness
Maestro is designed to tackle the unpredictable behavior of mobile and web apps. It automatically manages waits for elements and animations, so you don’t have to fiddle with manual wait times or retry logic. By default, Maestro uses specific timeouts: 17 seconds for element lookups, 7 seconds for optional elements, and 2 seconds for animations. It also applies a 0.5% screenshot difference threshold to detect UI changes, ensuring smoother test execution.
How Easy It Is for QA Teams to Implement
Maestro simplifies test creation with its declarative YAML syntax, allowing you to focus on defining actions while it takes care of waiting and retries. For instance, a straightforward command like tapOn: "Login" will automatically wait up to 17 seconds for the button to appear before failing. This eliminates the need for repetitive code and manual retries, saving time and reducing complexity. Even non-technical users can leverage Maestro Studio to visually craft reliable tests without worrying about timing issues. However, in slower CI environments, such as GitHub Actions, you might need to use the extendedWaitUntil command with a custom timeout (e.g., 60,000ms) for elements that take longer to load.
Effect on Test Stability and Reliability
Maestro's timing management significantly reduces false failures caused by delays in the network, animations, or device performance. For example, if a button appears a few seconds later than expected, the framework adapts and ensures the test passes reliably. This approach makes your tests more stable and helps you focus on identifying genuine issues rather than chasing inconsistencies.
Support for Debugging and Finding Root Causes
Maestro's built-in tolerance also makes debugging easier by addressing timing issues upfront. When a test does fail, it’s simpler to identify whether the problem lies in the test logic or the app itself, rather than being caused by environmental noise. However, certain edge cases, like apps with infinite animations (e.g., shimmer effects or video backgrounds), may need additional handling. In such scenarios, you can define the "ready" state manually using extendedWaitUntil for specific elements after animations settle. Similarly, apps relying on third-party SDKs (like Firebase or Facebook Login) may require explicit waits for UI states that confirm readiness, as Maestro waits for visible elements rather than background processes to finish. In slower environments, these hardcoded timeouts can also be managed with extendedWaitUntil commands.
6. Capture Logs, Screenshots, and Videos When Tests Fail
How Easy It Is for QA Teams to Implement
Modern test frameworks and CI/CD tools make it straightforward to capture logs, screenshots, and videos when tests fail. These features are often built into test automation tools and integrate seamlessly with CI/CD pipelines to produce detailed failure reports. With Maestro's built-in flakiness tolerance, failures are uncommon. However, when they do occur, the detailed captures these tools provide make identifying the issue much faster. This immediate availability of data speeds up the process of diagnosing problems.
Support for Debugging and Finding Root Causes
The data collected during test failures plays a crucial role in debugging. By capturing this information upfront, teams can avoid the hassle of trying to reproduce the failure later. For instance, if a test fails in the CI pipeline but runs fine locally, logs can shed light on issues like network timeouts or resource contention. Screenshots provide a snapshot of the UI at the exact moment of failure, while videos offer a complete view of the test sequence. Timing issues, which might go unnoticed in screenshots, become obvious in videos. For example, a video might show that an element appears three seconds too late, signaling the need for a wait time adjustment.
In some cases, media captures reveal patterns that help pinpoint the root cause. Teams have identified failures tied to specific conditions, like heavy system loads or certain browsers, which allowed them to implement targeted fixes such as dynamic waits. Additionally, visual diffs from screenshots and network tab analyses can highlight rendering problems or race conditions that might not be apparent from logs alone.
Effect on Test Stability and Reliability
Detailed data capture is a game changer for distinguishing between real bugs and false failures. By combining logs with screenshots, teams can quickly identify whether a failure stems from a genuine product defect or just test flakiness. For instance, a screenshot showing a loading spinner might indicate a timing issue rather than a code problem. This level of clarity helps teams avoid wasting time on non-issues and ensures their focus remains on addressing actual defects. It’s an approach that ultimately improves both the stability and reliability of the testing process.
7. Set Up Automatic Retries for Specific Failures
How It Reduces Test Flakiness
Automatic retries are a game-changer for handling transient failures that often make tests flaky. Issues like network delays or UI animations can cause tests to fail unpredictably. For example, an API call might take just 100ms locally but stretch to 2,000ms in a CI environment. Similarly, UI elements might not respond as expected during animations. Automatic retries allow tests to account for these delays, ensuring they stabilize before proceeding. This approach is especially helpful when dynamic waits or clean environments alone aren't enough to eliminate these hiccups.
How Easy It Is for QA Teams to Implement
Automatic retries are relatively simple to integrate into modern testing workflows. Many testing frameworks now offer targeted retry options, letting you focus on high-risk actions like "Submit" or "Search" without introducing unnecessary delays to the rest of your test flow. For CI environments, you can tweak configurations to increase retry thresholds, accommodating slower hardware or shared resources. Tools like Maestro come equipped with built-in flakiness tolerance, seamlessly combining dynamic waits with retries to address edge cases without manual intervention.
Effect on Test Stability and Reliability
Properly implemented, automatic retries can significantly improve test stability while keeping execution times under control. They help avoid the "Workaround Tax", where manual fixes for flakiness can add up to 16 extra minutes for a suite of 50 tests. By focusing retries on assertions - such as assertVisible - you can ensure transient issues are handled without risking errors like double submissions from state-changing actions like tapOn.
Support for Debugging and Finding Root Causes
Beyond addressing flakiness, automatic retries also provide valuable insights into underlying issues. If a test consistently passes only after retries, it could indicate timing problems, such as delayed animations or slow SDK initialization. Comparing retry patterns between local and CI environments can reveal infrastructure-specific issues, like API latency differences (e.g., 10ms locally vs. 2,000ms in CI). These patterns not only help fine-tune your test setup but also highlight areas where performance improvements are needed. Tracking these retry trends can sharpen your debugging process and pave the way for smoother testing in the future.
8. Quarantine Flaky Tests and Assign Owners
How It Reduces Test Flakiness
Quarantining flaky tests means separating them from stable ones, which helps prevent these unreliable tests from disrupting the consistent workflow of your test suite. When unstable tests are run alongside reliable ones, QA teams often resort to manual waits and retries to compensate - commonly referred to as the "Workaround Tax." By isolating these problematic tests, you eliminate unnecessary delays and ensure the stable tests perform as expected. This approach keeps your testing process efficient and consistent.
How Easy It Is for QA Teams to Implement
Setting up a separate suite or tagging system for unstable tests is straightforward and highly effective. Assign specific team members to own and address these tests. For instance, tests that involve infinite animations or video backgrounds might struggle with standard timeouts. They can also be affected by external factors like delays caused by third-party SDKs or network inconsistencies. In CI environments, API latencies can vary widely, from 200 to 2,000 milliseconds, compared to the steady performance of local mocks.
Effect on Test Stability and Reliability
By segregating flaky tests, you protect the integrity of your main test suite. This separation not only reduces the overall runtime but can also lead to significant cost savings. Developers benefit from quicker and more reliable feedback, as the main suite remains focused and efficient. This strategy simplifies debugging and ensures that results are both timely and accurate.
Support for Debugging and Finding Root Causes
Isolated flaky tests make it easier to dive deep into platform-specific issues and refine configurations. Owners can examine problems like touch latencies on real devices or delays during app switching. They can also fine-tune settings to reflect real-world conditions. For example, they might identify whether failures are caused by hardcoded timeouts designed for fast local machines but unsuitable for shared CI runners, or by hidden delays from third-party integrations. This targeted approach helps pinpoint the root causes and resolve them effectively.
9. Run Multiple Iterations to Confirm Intermittent Failures
How It Reduces Test Flakiness
Running tests multiple times helps separate actual bugs from timing-related issues. For example, if a test consistently passes on your local machine but fails 20% of the time in a CI environment, it's likely due to timing problems tied to the environment, not faulty code. Repeated runs can expose race conditions, such as tests executing before an API call finishes or before animations complete. Picture this: if an API takes 5 seconds to respond on a slower CI day, but your test only waits 2 seconds, running the test multiple times will reveal that it only passes when the network is faster.
Third-party SDKs like Firebase, Facebook, or Google Maps often add variability, taking anywhere from 1 to 8 seconds to initialize. Similarly, animations like skeleton loaders or infinite shimmers may sometimes exceed the typical 2-second wait time. Repeated iterations can expose these timing inconsistencies, making them easier to address.
How Easy It Is for QA Teams to Implement
Most test frameworks make it simple to rerun tests multiple times by using a basic command-line flag. By comparing pass rates across different environments, you can identify patterns. For instance, if a test behaves consistently on your local machine but becomes flaky in CI, the root cause is likely network latency or runner performance issues, rather than your application logic. Network delays can jump from 10ms locally to over 2,000ms in shared CI environments. Running tests repeatedly works well alongside other strategies to spot and address timing issues proactively.
Effect on Test Stability and Reliability
Although running multiple iterations improves test reliability, it does come at a cost. Adding manual retries can increase test runtime significantly. For instance, if each retry adds 10 seconds and you have a suite with 50 tests, you’re looking at an extra 8 minutes. A suite that originally took 10 minutes could stretch to 26 minutes with retries and additional waits. To balance efficiency and reliability, focus retries on specific high-risk steps, such as tapOn or assertVisible, instead of retrying entire tests. This approach minimizes unnecessary delays while addressing intermittent failures effectively.
Support for Debugging and Finding Root Causes
Beyond improving stability, multiple iterations also make debugging easier by highlighting timing constraints. Take Maestro's built-in element lookup timeout, which is set at 17 seconds. While this might be sufficient locally, shared CI runners often need more time - app launches alone can take over 8 seconds. Running tests repeatedly helps clarify whether failures stem from timeouts or external delays. These insights also connect back to earlier strategies, like using dynamic waits and isolating environments, allowing you to fine-tune your testing approach for better results.
10. Track Pass/Fail Rates and Flag Tests Below 95% Success
How It Reduces Test Flakiness
Keeping an eye on pass/fail rates is a straightforward way to identify unreliable tests. Instead of making assumptions, you can rely on data - like noticing a test that passes 88% of the time compared to one with a 99% success rate. By flagging tests that fall below a 95% success threshold, you set a clear standard for identifying problematic patterns. Research indicates that over 70% of flaky tests display inconsistent behavior during initial runs, so catching them early can prevent unnecessary delays.
This method transforms vague complaints into actionable insights. Instead of saying, "This test sometimes fails", you can confidently state, "This test fails 30% of the time under specific conditions." With this level of detail, it’s easier to prioritize fixes and pinpoint whether the issues are caused by timing glitches, network instability, or environmental factors.
How Easy It Is for QA Teams to Implement
Setting up pass/fail tracking is surprisingly simple and can typically be done in under an hour using most CI/CD tools. All it takes is configuring your pipeline to run tests multiple times - anywhere from 10 to 50 iterations - logging the results, and setting alerts for tests that dip below the 95% success threshold. Many CI tools already include built-in metrics or plugins, so there’s no need for custom coding.
For instance, if you’re using Maestro flows in your CI pipeline, you can run the same flow 20 times and calculate the pass rate. Let’s say a flow designed to search for and follow @mobile_dev on Twitter only succeeds in 17 out of 20 runs (85%). That test should be flagged immediately. The setup is straightforward: add a runFlow loop in your CI configuration, capture the results, and create a simple dashboard or report to spotlight underperforming tests.
Effect on Test Stability and Reliability
Flagging tests with less than 95% success creates a quality checkpoint that prevents flaky tests from disrupting overall results. This threshold ensures that any test falling short gets immediate attention, minimizing the risk of blocking other work. Teams that adopt this approach often see stabilization times improve by 2 to 3 times compared to relying on ad-hoc debugging.
The 95% benchmark is also practical - it catches genuine problems while ignoring occasional infrastructure hiccups. Tests that fail 30% or more of the time not only obscure real bugs but also waste time with manual retries. Addressing these issues early can significantly reduce your backlog. This data-driven approach complements other strategies by shining a light on tests that need urgent fixes.
Support for Debugging and Finding Root Causes
Beyond boosting stability, tracking pass/fail rates enhances your debugging process. Historical data from pass/fail tracking can speed up troubleshooting by linking test outcomes to logs, screenshots, and specific commits. This makes it easier to identify patterns, such as a test that only fails on Android devices or failures tied to a particular code change. Teams leveraging this data can cut debugging time by up to 70%.
Additionally, this data helps categorize failures by their root causes - whether they stem from timing issues, network delays, or UI changes. For example, if a test consistently shows an 88% pass rate due to network delays, you’ll know to tweak wait conditions rather than rewriting the entire test. This kind of insight ties back to earlier strategies, like using dynamic waits and isolating environments, giving you a clearer roadmap for resolving issues effectively.
How to Deal with UI Test Flakiness – Best Practices for Stable Test Automation
Conclusion
Flaky tests come with a hefty price tag. When QA teams resort to quick fixes like adding extra waits or manually retrying tests, a suite of 50 tests that should finish in 10 minutes can stretch to 26 minutes. That’s a 16-minute "workaround tax" that not only delays developer feedback but also inflates CI costs. For large engineering teams, this can add up to six-figure expenses annually. These inefficiencies highlight the importance of having a strong, well-thought-out testing strategy.
The strategies discussed here offer a clear path to reducing test flakiness. The focus should always be on consistency. Fixing one test isn’t enough; it’s crucial to regularly monitor for environmental differences and account for delays caused by SDKs. Variances in testing environments, in particular, can significantly impact test timing.
Using tools like Maestro can help address these timing challenges. For example, Maestro’s default 17-second lookup timeout works well for fast applications. However, for slower CI setups or delays caused by third-party SDKs, the extendedWaitUntil feature allows for custom timeouts of 30–60 seconds, providing much-needed flexibility.
Keeping an eye on runtime metrics is another essential step. This helps identify when workarounds start to pile up. Additionally, it’s important to distinguish between testing on emulators and real devices. Real hardware often introduces 50–200 ms touch latency and has varying rendering behaviors, which might require adjusting screenshot thresholds. These proactive measures can help QA teams maintain testing efficiency without compromising development speed.
Addressing flaky tests is not a one-time task - it requires ongoing effort. By following these best practices and utilizing advanced tools like Maestro, QA teams can create test suites that are both fast and dependable, ensuring smoother software delivery and fewer false alarms.
FAQs
×
How can I tell if a failure is flaky or a real bug?
Flaky tests are unpredictable - they fail sometimes and pass other times. This often happens because of timing issues, network instability, or unreliable environments. On the other hand, real bugs usually cause tests to fail consistently.
To spot flakiness, try running the same test several times. If the failures are inconsistent, you’re likely dealing with a flaky test. Tools like Maestro can assist by managing waits and retries, reducing the impact of flakiness. However, if a test fails the same way every time, it’s likely a real bug that needs manual investigation.
×
What should I retry, and what should I never retry?
Retry actions that are more likely to experience transient hiccups, such as UI interactions, network delays, or animations. Maestro already includes built-in tolerance to manage many of these situations automatically.
On the other hand, avoid retrying deterministic actions - things like verifying stable system states or completing setup steps. Retrying these won't fix flakiness and might actually hide deeper problems.
When to retry: Actions prone to timing issues or instability.
When NOT to retry: Steps that are stable and predictable.
×
How do I choose the right wait timeouts for CI?
Avoid relying on manual delays like sleep() in your tests. These can cause unnecessary wait times and increase costs in your CI/CD pipelines. Instead, consider tools like Maestro, which can automatically manage waits, retries, and delays caused by UI animations, network fluctuations, or app load times. With its built-in tolerance, Maestro ensures tests run smoothly without requiring static timeout values, helping stabilize flaky tests and improve performance in your CI workflows.